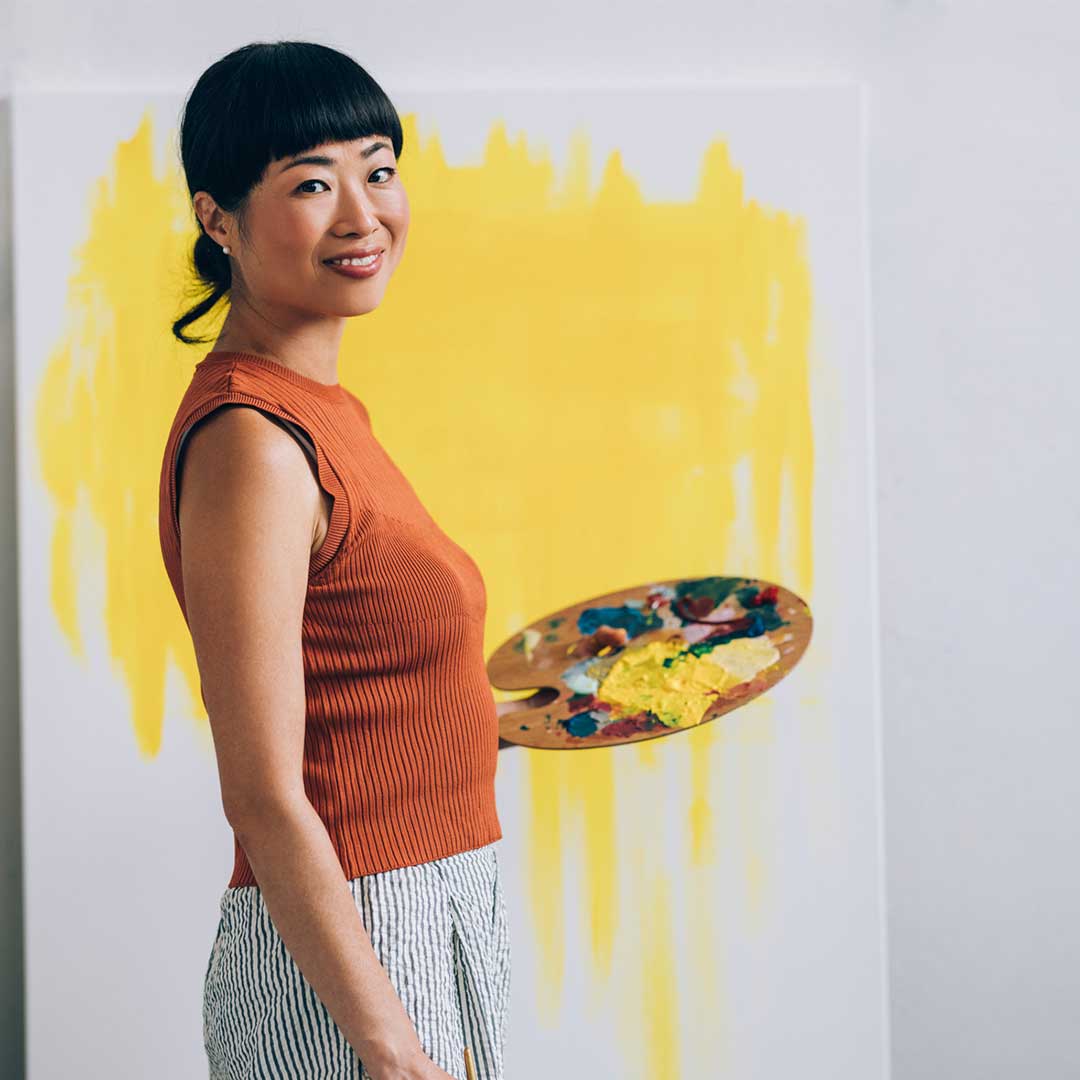
Growing up in a little town in Devon, surrounded by the sea on one side and the countryside on the other, was quite idyllic. Being the only girl in a family of boys meant I was a bit of a tomboy. We spent most of our time outside, climbing trees, exploring, or on the beach. When we finally ventured inside after a long day of playing in the garden, I loved to be in the kitchen with my mum for some girl time. Funnily enough, most of my fondest memories involve food.
Food has always been a very special part of my family, whether it was my nan’s giant portion sizes that we all admired or the big family dinners we had. It was always fun to see if we could all squeeze around the dining table and enjoy my mum’s famous roast dinners on a Sunday. After locating several spare chairs from around the house and garden, we managed to just fit around it elbow to elbow. I feel quite lucky that I have a very close relationship with my family.
I once took a cooking class in Italy, and the teacher didn’t speak any English and I could not speak any Italian. It didn’t matter at all; we both spoke fluently with our love for food, and were able to communicate perfectly with just that.
I connect with people through food every day, whether it is with photos of things I am making or the food I actually prepare for people to eat.
I often think about that experience and it has made me realize that people’s love for food is like a language—you don’t need words. Finding my passion for cooking and photography has changed my life, as I get to do something I am passionate about every day. I had always had a bit of a love/hate relationship with food and my weight, so learning to cook changed my mindset.
My passion for cooking really came into its own when I was working as a caregiver for a woman with Parkinson’s disease. It was quite a demanding job, and I needed something to do in my spare time to unwind and relax. I had always been creative, and initially I started a blog to share craft tutorials.
But in 2013 I discovered baking and I never looked back. Because I had to take photos of the things I had created for my blog, I started teaching myself how to take photos and experimenting. I soon fell in love with photography. I love to create photos that tell a story.
I spend every day cooking or taking photos and creating or planning the next thing I want to make or photograph. It’s meant that I can work from home, travel the world and meet so many wonderful people.
I think my passion for cooking happened the first time I cooked a meal for my family and they enjoyed it. Seeing the smile on their faces as they ate it brought me so much joy. There is something so therapeutic about cooking and creating. I just love being able to share the things I make with the people I love.
I don’t need to use words to convey passion, it seeps out of a person and into what they create for everyone to see.
My love for photography started as a necessity, but soon turned into a passion. I’m not a great writer, but I love to tell stories, so being able to do that with my photos in a visual form is so fun.
I don’t know why, but I always feel it’s wrong to say I am a self-taught baker and photographer. I learnt through trial and error; seeing things other people had done and then trying it myself. I taught myself most of what I know today, and it took a long time. That’s one of the reasons I started teaching workshops–I wish I could have attended one when I was starting out.
Foraging wild fennel
I enjoy being able to share everything I have learnt over the years, and maybe make that journey a bit easier for others. I love developing recipes and experimenting in the kitchen. I tend to have several base recipes and then constantly adapt them. Watching baking shows like The Great British Bake Off taught me so many techniques that I then took into my own kitchen.
I love to sketch out my ideas in a little notebook. I carry it with me everywhere, as I find that I will suddenly get an idea and need to write it down right away. Then I will go and research that idea further and look for inspiration. I usually sketch it a few times to get the idea exactly how I want it, then I start creating. It’s so fun to bring my ideas to life.
I often do this for shoots too and plan out the scenes first. Sometimes I create things out of the blue with no plan, but a lot of the time there has been a fair amount of thought behind it. I try to think of the things I create as a visual story, so I like to use the tones and light in my photos to help create a mood. I also love to use a human element in my photos.
I find inspiration in so many places, but most of all in nature. I also find that old paintings have really inspired my style. The use of light and shadow in Rembrandt paintings is something I try to achieve in my photos. I love looking on Pinterest and Instagram and seeing things other people have created too.
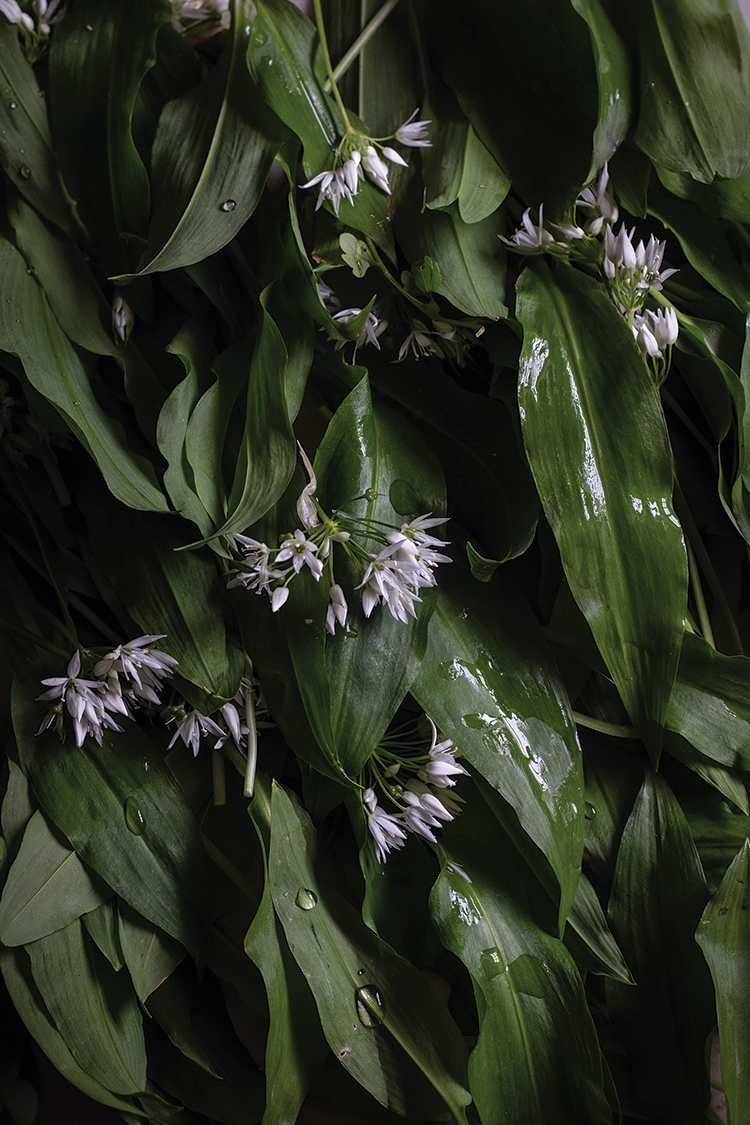
Foraging wild garlic
I am a bit of a magpie and have accumulated a huge collection of props over the years. I love to buy vintage things, as I feel like they have a story and have so much character. I am quite sentimental, and I remember where and when I got almost everything in my collection.
I have quite a few favorites though; it’s hard to pick just one.
When the algorithm on Instagram was initially implemented, I found it a struggle at first. I felt so creatively restrained and had to be like a sheep and do the same as everyone else. Last year I taught at the Forage Feast Photography workshop in Provence hosted by Ruth Ribeaucourt. At the workshop we discussed Instagram, and one of the other teachers, Valeria Necchio, said the most inspiring things. It completely changed everything for me.
I felt like I was only creating content that would look nice on the grid or not get hidden by the algorithm. I realized that it makes you lose your creativity and your authenticity when you think like that. I felt like I was losing mine. After I got home from that trip, I stopped worrying and started creating things that I wanted to create, and it’s changed everything. I now find that I am more creative than ever. I don’t find that the algorithm stops me now; in fact I find it has made me more creative. I have to think outside the box and create things that are a little different, and it spurs me on.
I find that my biggest creative struggle is that I often oversaturate myself with too much inspiration, and sometimes I feel a huge overwhelm. I will have too many ideas and then not know where to start, and then end up doing nothing. I go through phases when I am really inspired and then have spells when I am lost for ideas. I find that a break doing something completely different or walking the dog in the woods soon sorts that out.
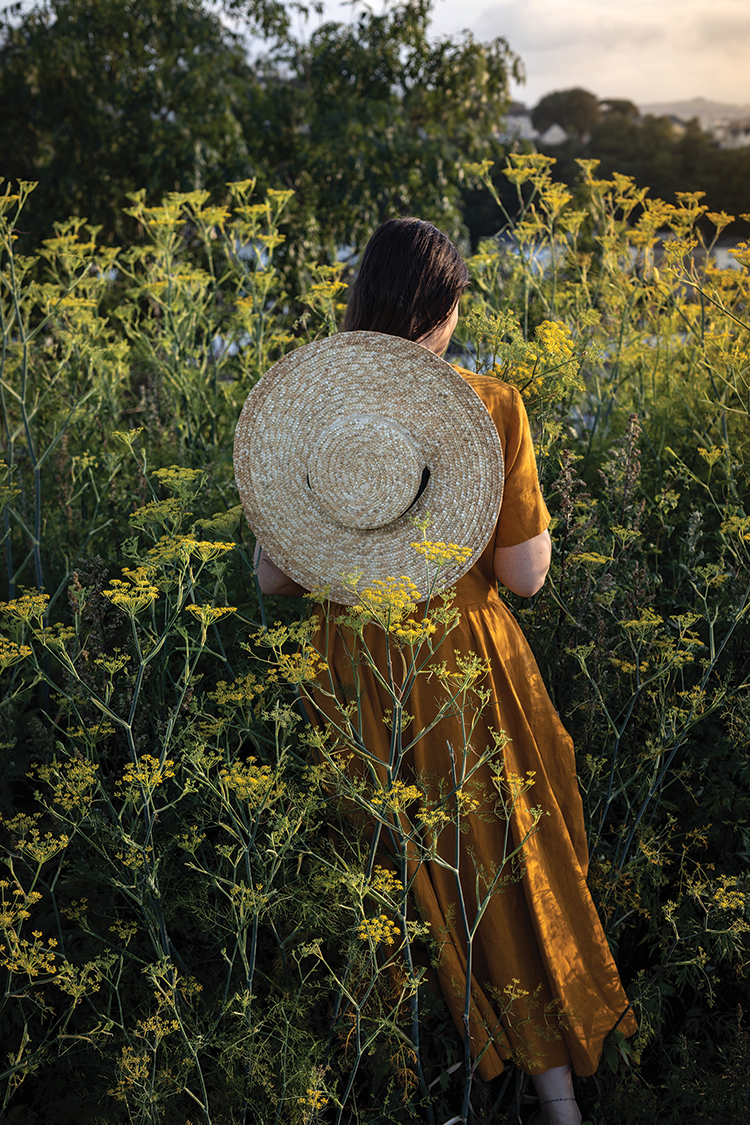
I love using fennel pollen in recipes because it is packed with flavour. The little yellow flowers that appear during the summer months are culinary gems. We often go out to pick the wild fennel pollen that grows along the cliff near my house. We come home laden with the flowers. I let it sit in water for a few days in a small vase over some newspaper, then I gently rub the pollen off.
The flavour is a little more intense than the fennel seeds which appear on the plants a few weeks later. I go back and collect those too, and use them in my recipes. Aniseed-like scents fill the air when you come across a patch of the fennel growing wild; the spicy yet floral smell makes it easy to sniff out these flowers from afar.
Fennel pollen is often thought of as a luxury—after the pollen is collected, the tiny heads of wild fennel flowers are picked off and dried, making a powder-like spice. It has a sweeter and more intense flavour than fennel seeds, meaning that a little goes a long way. The smallest pinch of wild fennel pollen can transform a dish with heavenly, honey-aniseed flavours.
It can be a very expensive spice to buy, so I love to make the most of the season and collect some myself. Like saffron, it is quite labour intensive, so it means that it’s almost worth its weight in gold. After I have collected the tiny pollen heads I store them in an airtight jar to use throughout the year. When it’s time to collect the fennel seeds, I simply just cut the seed pods off and then gently shake it, and the seeds drop straight off.
Prepping fennel for recipe
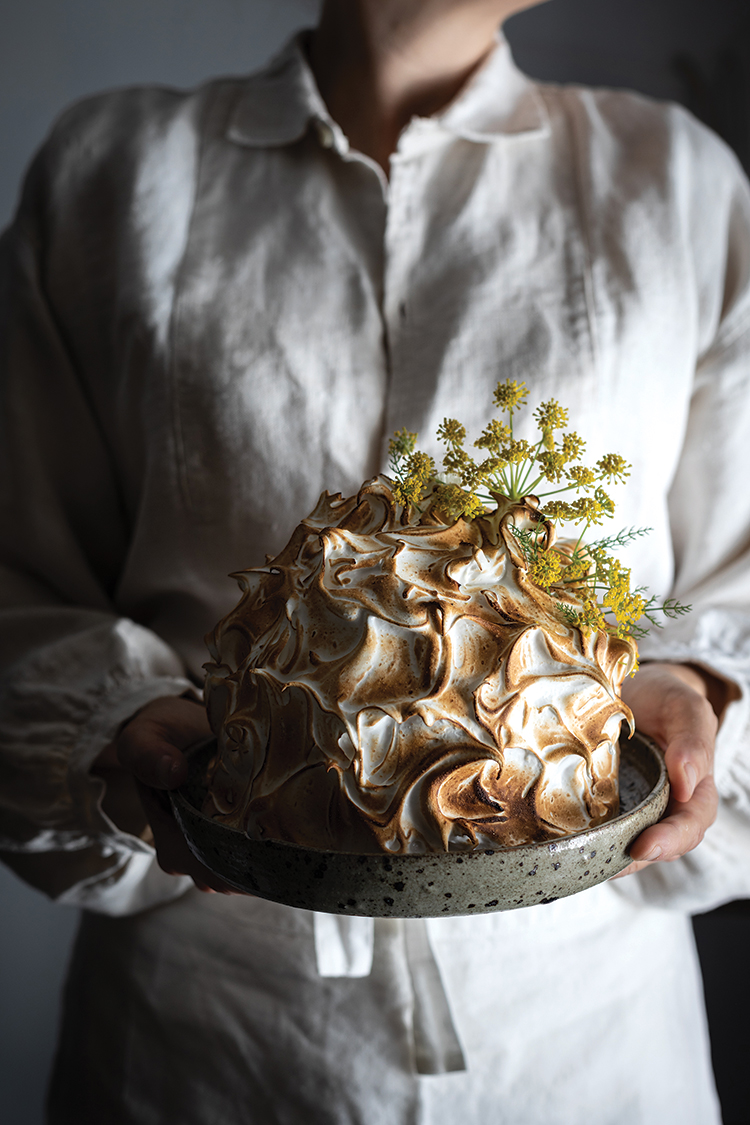
Fennel Pollen, Honey and Ricotta Ice Cream Baked Alaska
I know the idea of fennel pollen ice cream might sound a bit odd, but the warm aniseed-like flavours go so wonderfully with the creaminess of the ricotta ice cream base. The delicious ice cream sits on top of a feather-light almond flour sponge and is covered in a silky toasted meringue. This Baked Alaska is my spin on a retro classic.
Ingredients
For the Ice cream
egg yolks
150 ml runny honey
2 Tbsp brown sugar
300 ml whole milk
250 ml double cream
250 grams ricotta
1 tsp fennel blossom (plus more to your taste)(alternatively use ground fennel seeds)
½ tsp ground fennel seeds
½ tsp vanilla bean paste
For the Almond sponge
4 eggs, separated
150 grams caster sugar (plus 2 Tbsp)
½ tsp salt
1 tsp vanilla extract or vanilla bean paste
150 grams ground almonds
1 ½ tsp baking powder
For the Meringue
4 egg whites
200 grams caster sugar
½ tsp cream of tartar
Instructions
Make the ice cream
1. In saucepan whisk together egg yolks, honey and sugar, then mix in milk, cream and ricotta. Add fennel pollen, ground fennel seeds and vanilla. Stir constantly over medium heat until it thickens and becomes like custard.
2. Pour through sieve to remove any bits of fennel seeds. Place a layer of plastic wrap over custard and let cool, chill overnight in fridge. Or use the pre-chill function on an ice cream machine. Pour into ice cream machine to churn, then pour into a small bowl or mould lined with cling film and freeze.
Make the sponge
1. Preheat the oven to 160˚C. Grease and line a small cake tin that is the same size as the bowl you used for your ice cream. Separate eggs, add egg whites into the bowl of stand mixer fitted with balloon whisk attachment and start mixing at medium speed. Once it starts to thicken, add sugar a little at a time, reserving 3 Tbsp. Turn up the speed and beat for a few minutes until stiff peaks form and you have a meringue-like mixture.
2. In another bowl, mix yolks, 3 Tbsp sugar, salt, vanilla, almonds and baking powder. Take ¼ cup of meringue mixture and mix into it to loosen it, then add yolk mixture to meringue ⅓ cup at a time and gently fold in. Pour into cake tin. (I had enough to fill two tins so I saved the extra sponge for something else.) Bake 25–30 minutes. Let cool.
Make the meringue
1. Add egg whites in the bowl of stand mixer and start whipping. Once the mixture is bubbly and pale, add the sugar a little at a time, along with the cream of tartar, then turn up to high speed. Whip 5 minutes or until stiff peaks form.
2. Place ice cream on top of cake, then spread over the meringue so there are no gaps. Now blow touch it or bake in a preheated oven at 180˚C for 5 minutes. Serve immediately.
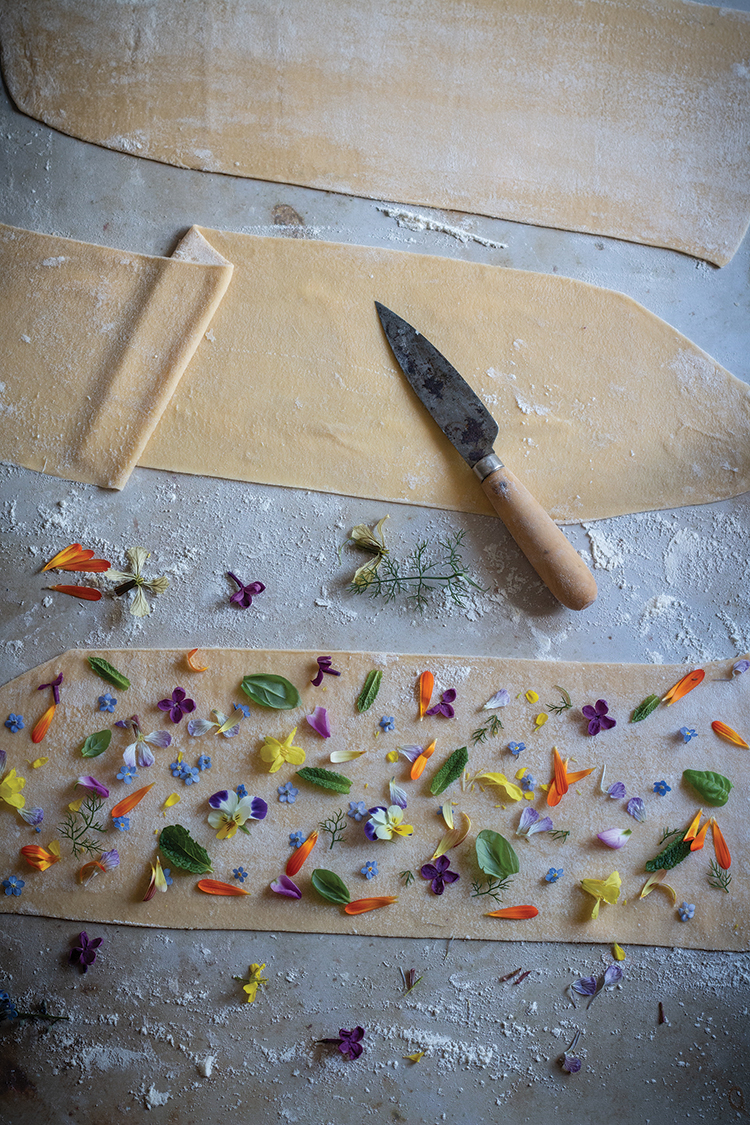
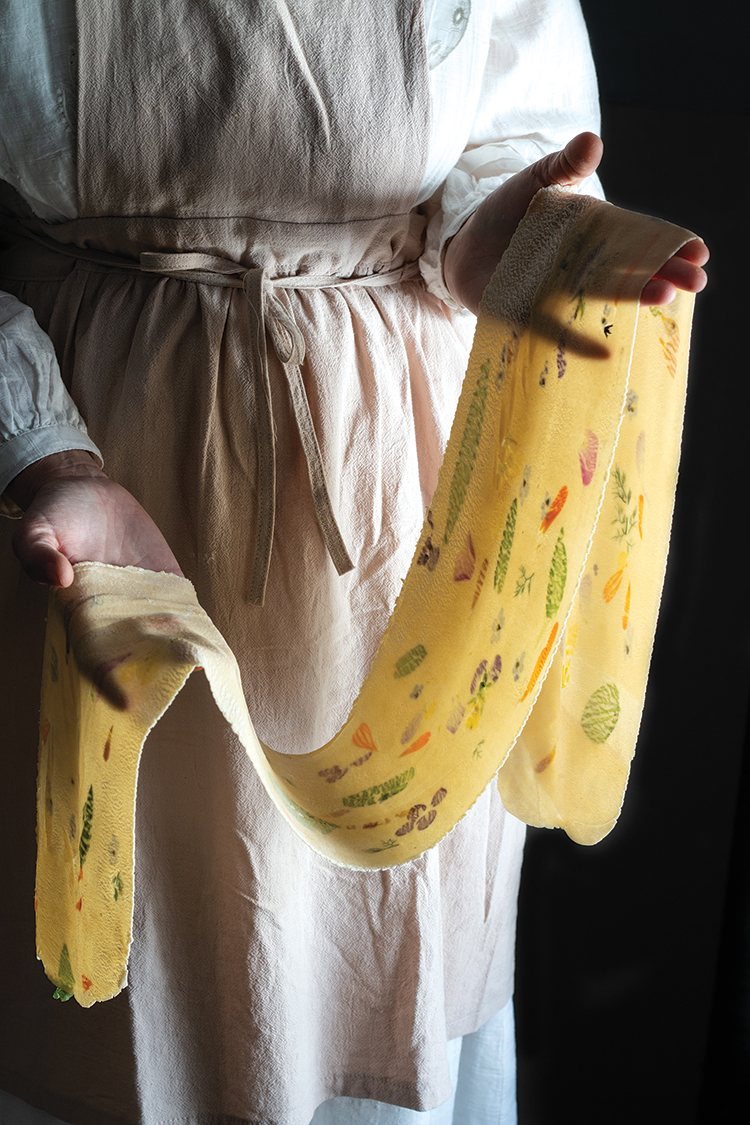
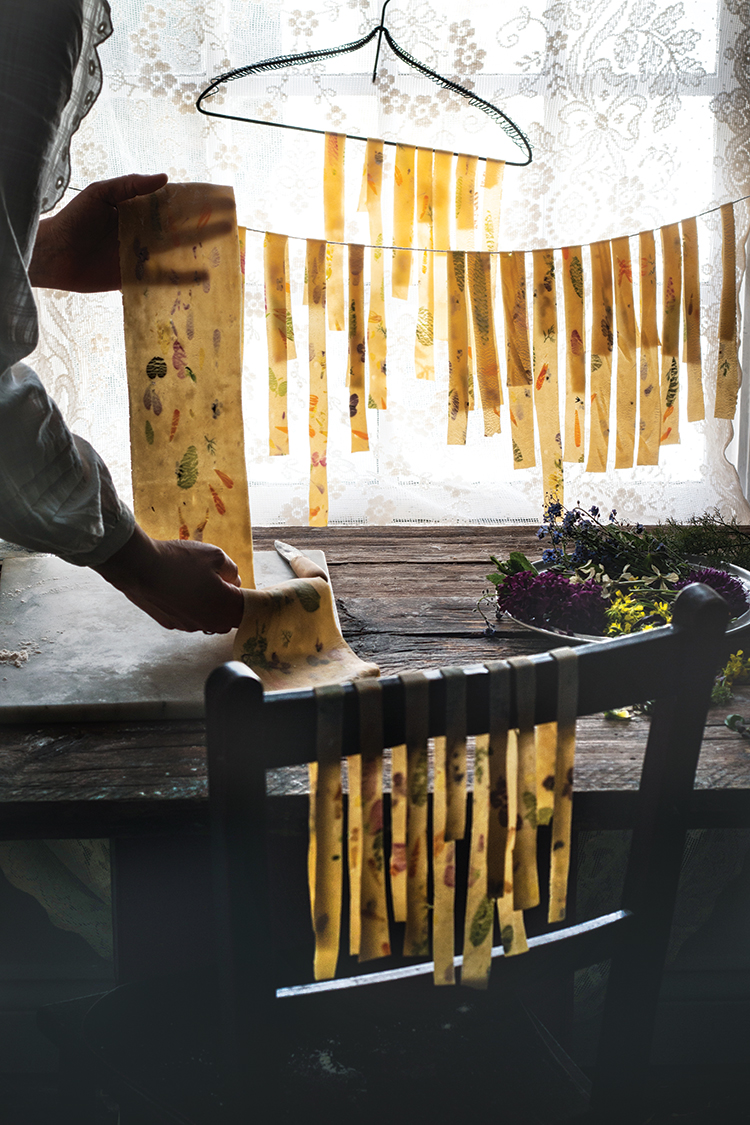
Edible flower pasta is made by laminating flowers or herbs between two pieces of dough. It’s an easy step that creates the most beautiful pasta, but that’s not all; the flowers and herbs can add flavour too. I love how the flowers look when you hold the pasta up to the light; they create a beautiful mosaic of colour like a painting.
Stained glass pasta with edible flowers or herbs
It’s almost like a work of art, you never know how it will look and each time it is different. Not only is this pasta great to eat, but it’s probably one of my favourite pastas to take photos of.
There are a few things to think about before you make this pasta, but overall it is really easy to make.
My top tip would be choosing herbs and flowers with thin leaves; remember that it is being pressed between two layers of pasta so the flatter and thinner it is, the better.
Herbs
The best herbs to use are soft leaved herbs like basil, dill, mint or oregano. This is because the leaves are going to roll through the machine and stretch easily, and these are flat.
Woody herbs like rosemary and thyme will tear the pasta dough so I wouldn’t recommend them for this. I have also made it with small spinach leaves, which worked well. Cut the stems off any of the herbs first.
Edible flowers
Flowers look so beautiful in the dough and make the pasta so colourful. There are a lot to choose from!
Pansies, violas, marigold petals, corn flower petals, dianthus, nasturtium, calendula and primroses are my favourite varieties to use, but other edible flowers are fine as long as the petals are thin. You can use whole pansies, primroses and violas if you carefully remove the stems; for the other flowers I mentioned I tend to just use the petals.
Herbs and flowers don’t just add colour but also flavor. A lot of edible flowers actually have quite a lot of flavour; some are really peppery, which is perfect for savoury recipes.
Make sure you use organic unsprayed flowers and herbs. I use violas and pansies most often as we have them in the garden, but you can order fresh-cut edible flowers now. I use herbs from the garden or the supermarket.
How to make it
1. Roll out the pasta sheet to as thin as you normally would so you have a nice thin long sheet. (Number 7 on my pasta machine seems to be the ideal thickness for me, but your machine may be different, so just go as thin as you can without the dough tearing). Then with a brush add little dots of water where you want to add the herbs or flowers and press on.
2. Space them out over half of the pasta sheet, remembering that they will stretch and change size, and then fold the other half of dough over and press together. Turn the pasta machine back up to two thicknesses wider than the one it was last rolled through before you added the herbs/flowers (number 5 on my machine) and roll through. Then turn it down to the next thickness and roll through again until it is nice and thin.
NOTE: The herbs/flowers will break up and stretch with the pressure of being rolled, so it can create some really amazing looking pasta. I love to use this type of pasta for ravioli and pappardelle so that you can see the beautiful pattern. I have also used it for lasagne, but it wasn’t really visible to the people eating it, it just added flavour.
Cooking the pasta
I don’t add salt to the pasta dough, but instead I add it to the water I am boiling the pasta in. Boil a big pan of water, and once it reaches the boil, add salt. I use a few teaspoons of salt so the water would be quite salty to taste, then add the pasta and boil it for about about 3–4 minutes, sometimes 4–5 minutes for filled or long pasta. It depends on the type of pasta you are cooking. When it floats to the top of the pan, usually around 3 minutes, I try a piece. If it tastes nice and al dente it is done, so drain it and serve.
I believe that a person’s passion for food is like a language that anyone with the same passions can understand.
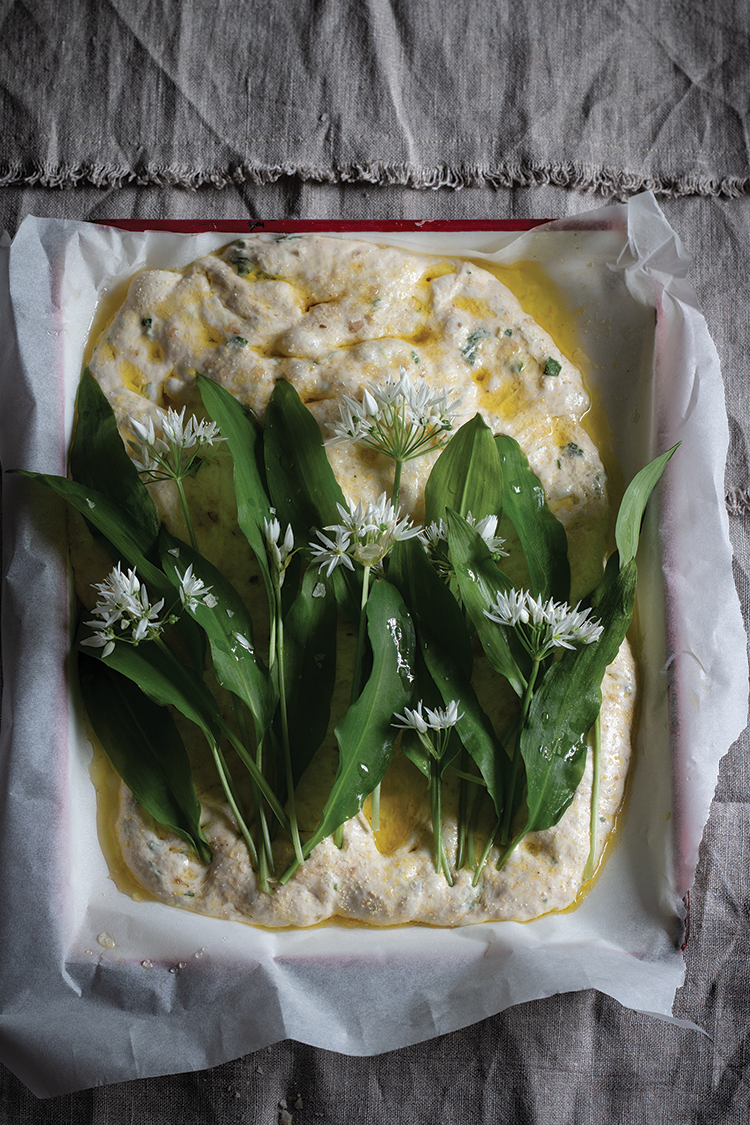
Garnish with wild garlic
Wild Garlic Focaccia
For the dough
300 grams strong white bread flour
7g sachet of fast action yeast
5 grams salt
2 ½ to 3 Tbsp olive oil (see directions)
5 wild garlic leaves finely chopped (optional)
200 ml water
For the topping
Olive oil
Fine Semolina for dusting
Wild garlic leaves and flowers (optional)
Salt
Directions
Because this dough is very wet and hard to work with, I recommend using a stand mixer fitted with a dough hook. It can be made by hand but it will be quite messy.
1. Add flour into the bowl of a stand mixer.
2. Add dried yeast to one side of the bowl and the salt to the other.
3. Add 2 Tbsp of olive oil, the finely chopped wild garlic, half the water and turn on the mixer. Slowly add the rest of the water a little at a time, turn mixer to full speed, mix 3 minutes.
4. The dough will start off looking very wet and unworkable but as the gluten in the dough builds it will come together and stop sticking to the side of the bowl. Add the last ½ Tbsp of oil a little at a time (if the dough can take it, you can add a full Tbsp; it depends on how dry your flour was to start with), and knead for a further 2–3 minutes until you have a wet, but manageable dough that no longer sticks to the bowl while it is kneading.
5. Turn mixer off and oil your hands. Stretch dough 4 or 5 times to check the gluten has formed enough. I hold the dough and let its weight pull downward on itself, then fold in half and do the same again a few times to stretch it. Generously pour some oil into bowl and place dough in. Cover with plastic wrap or damp tea towel. Leave to rise in a draft-free place for 1 hour until doubled in size.
6. Line a large rectangle baking tray with baking paper and sprinkle over some fine semolina. Tip the bowl straight onto it, trying not to knock any air out, gently pull the dough into a large rectangle that fills the tray.
7. Leave to rise again for 1 hour in a draft-free place. I place it in a cold oven with the door closed, but if you have a large bag you can place the tray in it, making sure it doesn’t touch the dough.
8. Preheat the oven to 220˚C (if using the wild garlic you can use a slightly lower temperature and bake for a little longer).
9. Sprinkle a little Semolina onto the dough.
10. Using oiled fingers, press indentations into the dough. Then place on some wild garlic leaves and drizzle over some olive oil and flaked salt. (Another good way for equal saltiness is to mix 4 Tbsp water, 4 Tbsp oil and 1 tsp salt, when salt has dissolved drizzle it over and bake). Otherwise just use olive oil and some flaked salt.
11. Bake 20 minutes, until golden and hollow-sounding when tapped on the base.
The herbs will turn brown and shrink in the oven, but will be wonderfully crispy and really delicious. If you can’t find any wild garlic, you can use Ramps or herbs instead like some chopped rosemary or thyme or chives. But the dough on its own with some good olive oil and salt is delicious.
Growing up in a little town in Devon, surrounded by the sea on one side and the countryside on the other, was quite idyllic. Being the only girl in a family of boys meant I was a bit of a tomboy. We spent most of our time outside, climbing trees, exploring, or on the beach. When we finally ventured inside after a long day of playing in the garden, I loved to be in the kitchen with my mum for some girl time. Funnily enough, most of my fondest memories involve food.
Food has always been a very special part of my family, whether it was my nan’s giant portion sizes that we all admired or the big family dinners we had. It was always fun to see if we could all squeeze around the dining table and enjoy my mum’s famous roast dinners on a Sunday. After locating several spare chairs from around the house and garden, we managed to just fit around it elbow to elbow. I feel quite lucky that I have a very close relationship with my family.
I once took a cooking class in Italy, and the teacher didn’t speak any English and I could not speak any Italian. It didn’t matter at all; we both spoke fluently with our love for food, and were able to communicate perfectly with just that.
I connect with people through food every day, whether it is with photos of things I am making or the food I actually prepare for people to eat.
I often think about that experience and it has made me realize that people’s love for food is like a language—you don’t need words. Finding my passion for cooking and photography has changed my life, as I get to do something I am passionate about every day. I had always had a bit of a love/hate relationship with food and my weight, so learning to cook changed my mindset.
My passion for cooking really came into its own when I was working as a caregiver for a woman with Parkinson’s disease. It was quite a demanding job, and I needed something to do in my spare time to unwind and relax. I had always been creative, and initially I started a blog to share craft tutorials.
But in 2013 I discovered baking and I never looked back. Because I had to take photos of the things I had created for my blog, I started teaching myself how to take photos and experimenting. I soon fell in love with photography. I love to create photos that tell a story.
I spend every day cooking or taking photos and creating or planning the next thing I want to make or photograph. It’s meant that I can work from home, travel the world and meet so many wonderful people.
I think my passion for cooking happened the first time I cooked a meal for my family and they enjoyed it. Seeing the smile on their faces as they ate it brought me so much joy. There is something so therapeutic about cooking and creating. I just love being able to share the things I make with the people I love.
I don’t need to use words to convey passion, it seeps out of a person and into what they create for everyone to see.
My love for photography started as a necessity, but soon turned into a passion. I’m not a great writer, but I love to tell stories, so being able to do that with my photos in a visual form is so fun.
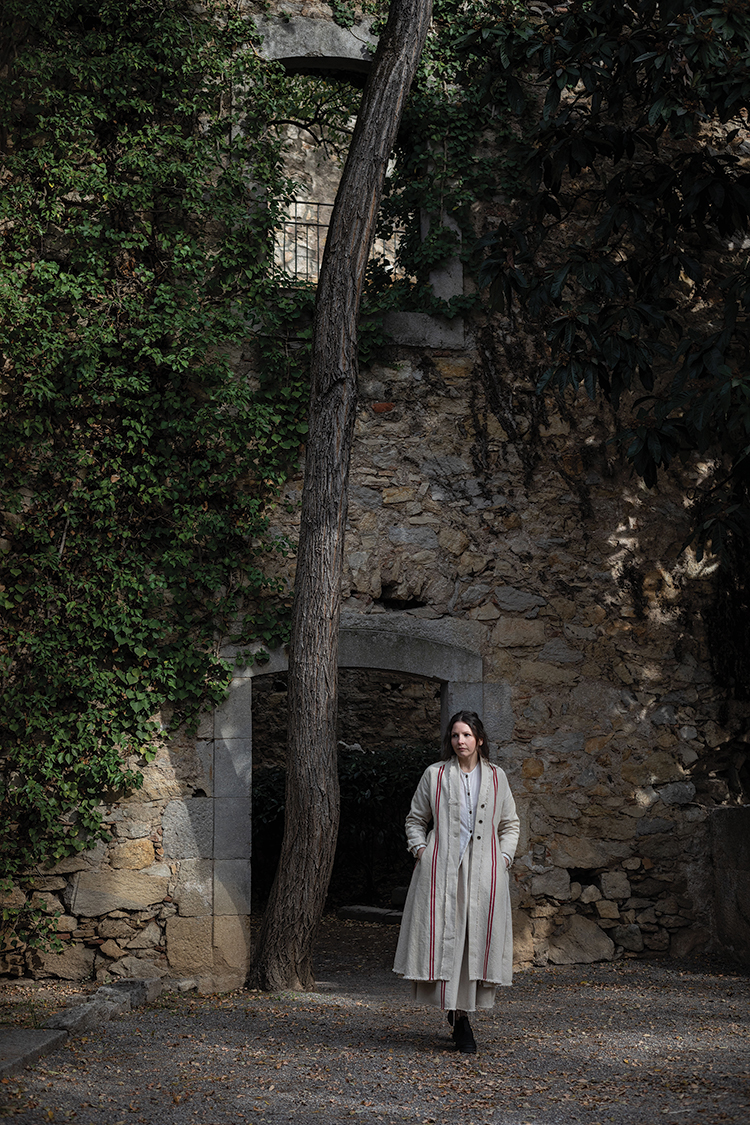
I don’t know why, but I always feel it’s wrong to say I am a self-taught baker and photographer. I learnt through trial and error; seeing things other people had done and then trying it myself. I taught myself most of what I know today, and it took a long time. That’s one of the reasons I started teaching workshops–I wish I could have attended one when I was starting out.
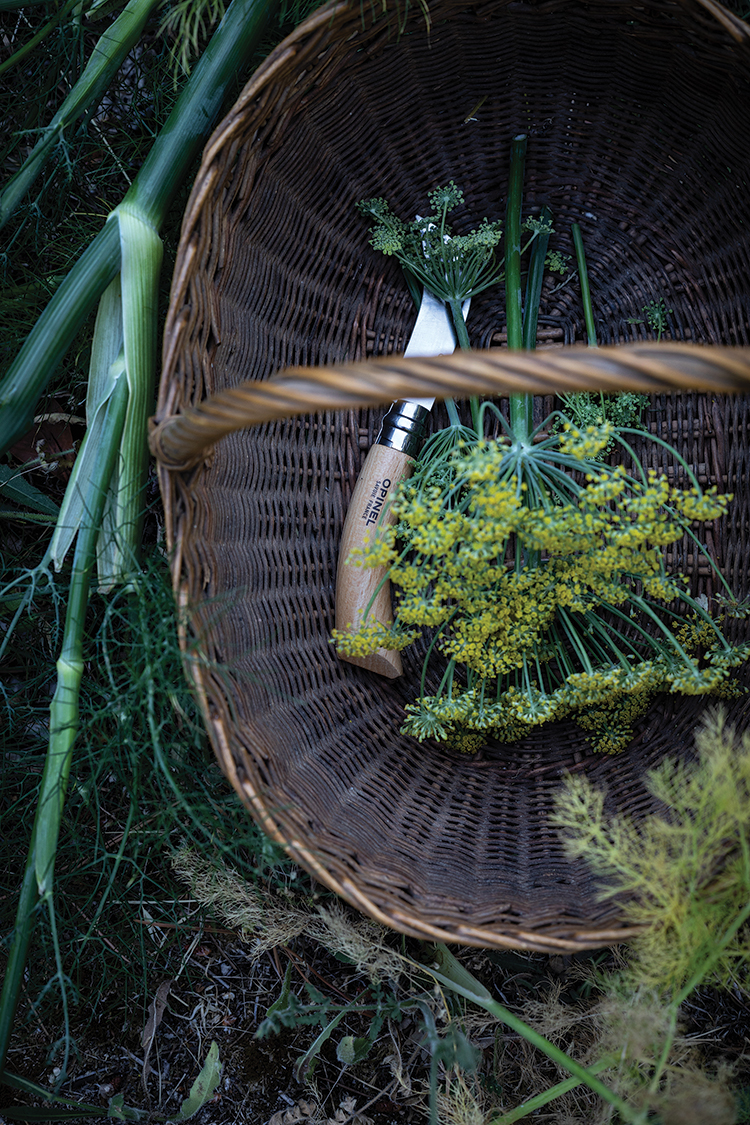
Foraging wild fennel
I enjoy being able to share everything I have learnt over the years, and maybe make that journey a bit easier for others. I love developing recipes and experimenting in the kitchen. I tend to have several base recipes and then constantly adapt them. Watching baking shows like The Great British Bake Off taught me so many techniques that I then took into my own kitchen.
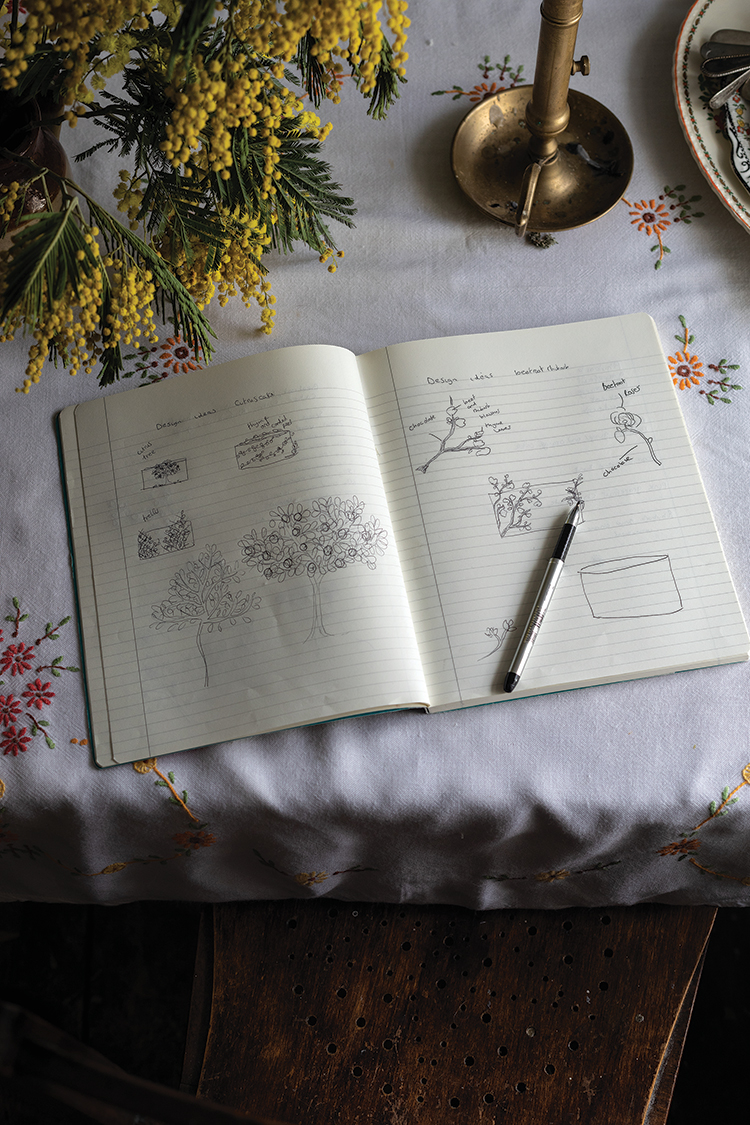
I love to sketch out my ideas in a little notebook. I carry it with me everywhere, as I find that I will suddenly get an idea and need to write it down right away. Then I will go and research that idea further and look for inspiration. I usually sketch it a few times to get the idea exactly how I want it, then I start creating. It’s so fun to bring my ideas to life.
I often do this for shoots too and plan out the scenes first. Sometimes I create things out of the blue with no plan, but a lot of the time there has been a fair amount of thought behind it. I try to think of the things I create as a visual story, so I like to use the tones and light in my photos to help create a mood. I also love to use a human element in my photos.
I find inspiration in so many places, but most of all in nature. I also find that old paintings have really inspired my style. The use of light and shadow in Rembrandt paintings is something I try to achieve in my photos. I love looking on Pinterest and Instagram and seeing things other people have created too.
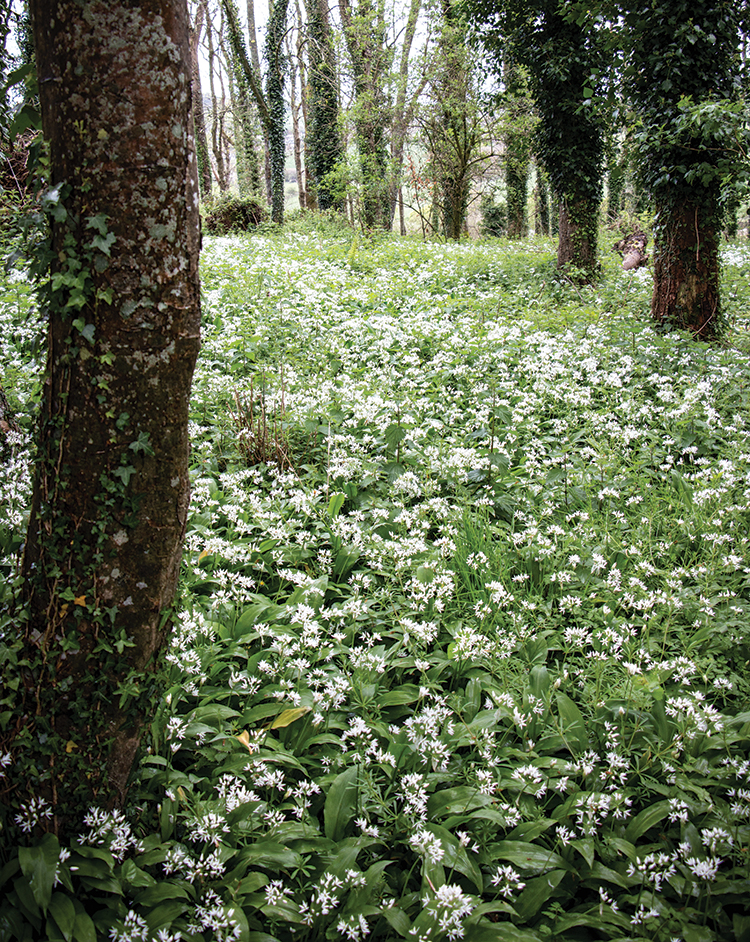
Foraging wild garlic
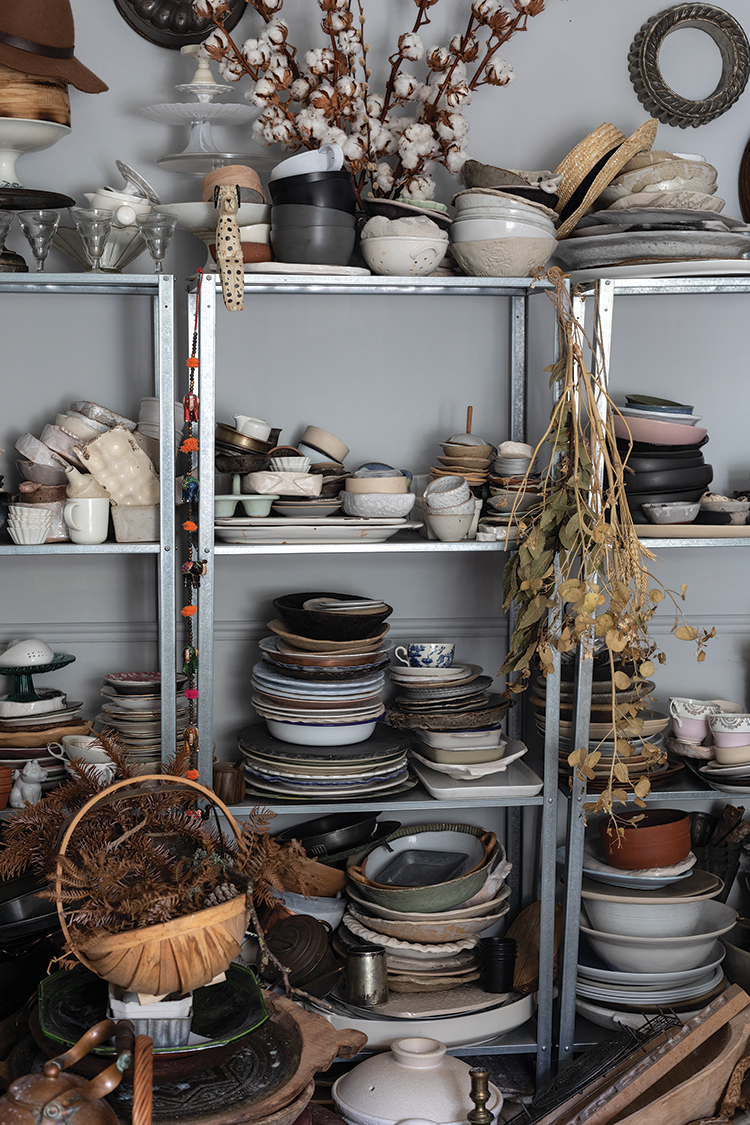
I am a bit of a magpie and have accumulated a huge collection of props over the years. I love to buy vintage things, as I feel like they have a story and have so much character. I am quite sentimental, and I remember where and when I got almost everything in my collection.
I have quite a few favorites though; it’s hard to pick just one.
When the algorithm on Instagram was initially implemented, I found it a struggle at first. I felt so creatively restrained and had to be like a sheep and do the same as everyone else. Last year I taught at the Forage Feast Photography workshop in Provence hosted by Ruth Ribeaucourt. At the workshop we discussed Instagram, and one of the other teachers, Valeria Necchio, said the most inspiring things. It completely changed everything for me.
I felt like I was only creating content that would look nice on the grid or not get hidden by the algorithm. I realized that it makes you lose your creativity and your authenticity when you think like that. I felt like I was losing mine. After I got home from that trip, I stopped worrying and started creating things that I wanted to create, and it’s changed everything. I now find that I am more creative than ever. I don’t find that the algorithm stops me now; in fact I find it has made me more creative. I have to think outside the box and create things that are a little different, and it spurs me on.
I find that my biggest creative struggle is that I often oversaturate myself with too much inspiration, and sometimes I feel a huge overwhelm. I will have too many ideas and then not know where to start, and then end up doing nothing. I go through phases when I am really inspired and then have spells when I am lost for ideas. I find that a break doing something completely different or walking the dog in the woods soon sorts that out.
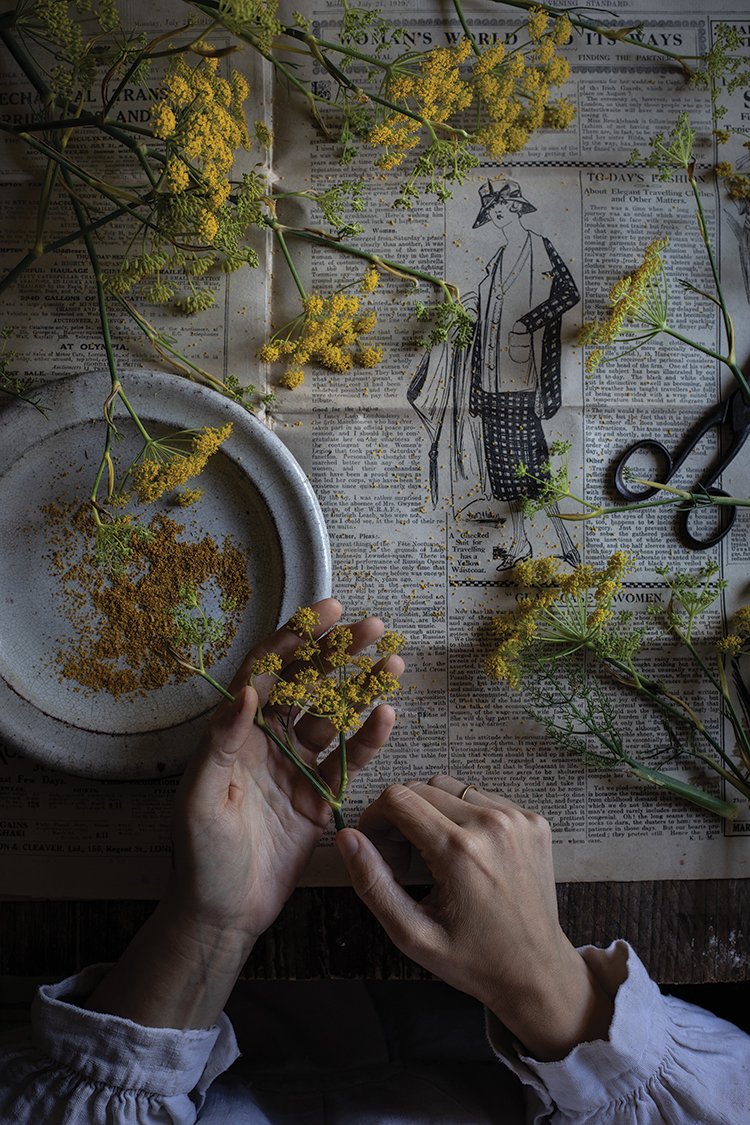
I love using fennel pollen in recipes because it is packed with flavour. The little yellow flowers that appear during the summer months are culinary gems. We often go out to pick the wild fennel pollen that grows along the cliff near my house. We come home laden with the flowers. I let it sit in water for a few days in a small vase over some newspaper, then I gently rub the pollen off.
The flavour is a little more intense than the fennel seeds which appear on the plants a few weeks later. I go back and collect those too, and use them in my recipes. Aniseed-like scents fill the air when you come across a patch of the fennel growing wild; the spicy yet floral smell makes it easy to sniff out these flowers from afar.
Fennel pollen is often thought of as a luxury—after the pollen is collected, the tiny heads of wild fennel flowers are picked off and dried, making a powder-like spice. It has a sweeter and more intense flavour than fennel seeds, meaning that a little goes a long way. The smallest pinch of wild fennel pollen can transform a dish with heavenly, honey-aniseed flavours.
It can be a very expensive spice to buy, so I love to make the most of the season and collect some myself. Like saffron, it is quite labour intensive, so it means that it’s almost worth its weight in gold. After I have collected the tiny pollen heads I store them in an airtight jar to use throughout the year. When it’s time to collect the fennel seeds, I simply just cut the seed pods off and then gently shake it, and the seeds drop straight off.
Prepping fennel for recipe
Fennel Pollen, Honey and Ricotta Ice Cream Baked Alaska
I know the idea of fennel pollen ice cream might sound a bit odd, but the warm aniseed-like flavours go so wonderfully with the creaminess of the ricotta ice cream base. The delicious ice cream sits on top of a feather-light almond flour sponge and is covered in a silky toasted meringue. This Baked Alaska is my spin on a retro classic.
Ingredients
For the Ice cream
egg yolks
150 ml runny honey
2 Tbsp brown sugar
300 ml whole milk
250 ml double cream
250 grams ricotta
1 tsp fennel blossom (plus more to your taste)(alternatively use ground fennel seeds)
½ tsp ground fennel seeds
½ tsp vanilla bean paste
For the Almond sponge
4 eggs, separated
150 grams caster sugar (plus 2 Tbsp)
½ tsp salt
1 tsp vanilla extract or vanilla bean paste
150 grams ground almonds
1 ½ tsp baking powder
For the Meringue
4 egg whites
200 grams caster sugar
½ tsp cream of tartar
Instructions
Make the ice cream
1. In saucepan whisk together egg yolks, honey and sugar, then mix in milk, cream and ricotta. Add fennel pollen, ground fennel seeds and vanilla. Stir constantly over medium heat until it thickens and becomes like custard.
2. Pour through sieve to remove any bits of fennel seeds. Place a layer of plastic wrap over custard and let cool, chill overnight in fridge. Or use the pre-chill function on an ice cream machine. Pour into ice cream machine to churn, then pour into a small bowl or mould lined with cling film and freeze.
Make the sponge
1. Preheat the oven to 160˚C. Grease and line a small cake tin that is the same size as the bowl you used for your ice cream. Separate eggs, add egg whites into the bowl of stand mixer fitted with balloon whisk attachment and start mixing at medium speed. Once it starts to thicken, add sugar a little at a time, reserving 3 Tbsp. Turn up the speed and beat for a few minutes until stiff peaks form and you have a meringue-like mixture.
2. In another bowl, mix yolks, 3 Tbsp sugar, salt, vanilla, almonds and baking powder. Take ¼ cup of meringue mixture and mix into it to loosen it, then add yolk mixture to meringue ⅓ cup at a time and gently fold in. Pour into cake tin. (I had enough to fill two tins so I saved the extra sponge for something else.) Bake 25–30 minutes. Let cool.
Make the meringue
1. Add egg whites in the bowl of stand mixer and start whipping. Once the mixture is bubbly and pale, add the sugar a little at a time, along with the cream of tartar, then turn up to high speed. Whip 5 minutes or until stiff peaks form.
2. Place ice cream on top of cake, then spread over the meringue so there are no gaps. Now blow touch it or bake in a preheated oven at 180˚C for 5 minutes. Serve immediately.
Edible flower pasta is made by laminating flowers or herbs between two pieces of dough. It’s an easy step that creates the most beautiful pasta, but that’s not all; the flowers and herbs can add flavour too. I love how the flowers look when you hold the pasta up to the light; they create a beautiful mosaic of colour like a painting.
Stained glass pasta with edible flowers or herbs
It’s almost like a work of art, you never know how it will look and each time it is different. Not only is this pasta great to eat, but it’s probably one of my favourite pastas to take photos of.
There are a few things to think about before you make this pasta, but overall it is really easy to make.
My top tip would be choosing herbs and flowers with thin leaves; remember that it is being pressed between two layers of pasta so the flatter and thinner it is, the better.
Herbs
The best herbs to use are soft leaved herbs like basil, dill, mint or oregano. This is because the leaves are going to roll through the machine and stretch easily, and these are flat.
Woody herbs like rosemary and thyme will tear the pasta dough so I wouldn’t recommend them for this. I have also made it with small spinach leaves, which worked well. Cut the stems off any of the herbs first.
Edible flowers
Flowers look so beautiful in the dough and make the pasta so colourful. There are a lot to choose from!
Pansies, violas, marigold petals, corn flower petals, dianthus, nasturtium, calendula and primroses are my favourite varieties to use, but other edible flowers are fine as long as the petals are thin. You can use whole pansies, primroses and violas if you carefully remove the stems; for the other flowers I mentioned I tend to just use the petals.
Herbs and flowers don’t just add colour but also flavor. A lot of edible flowers actually have quite a lot of flavour; some are really peppery, which is perfect for savoury recipes.
Make sure you use organic unsprayed flowers and herbs. I use violas and pansies most often as we have them in the garden, but you can order fresh-cut edible flowers now. I use herbs from the garden or the supermarket.
How to make it
1. Roll out the pasta sheet to as thin as you normally would so you have a nice thin long sheet. (Number 7 on my pasta machine seems to be the ideal thickness for me, but your machine may be different, so just go as thin as you can without the dough tearing). Then with a brush add little dots of water where you want to add the herbs or flowers and press on.
2. Space them out over half of the pasta sheet, remembering that they will stretch and change size, and then fold the other half of dough over and press together. Turn the pasta machine back up to two thicknesses wider than the one it was last rolled through before you added the herbs/flowers (number 5 on my machine) and roll through. Then turn it down to the next thickness and roll through again until it is nice and thin.
NOTE: The herbs/flowers will break up and stretch with the pressure of being rolled, so it can create some really amazing looking pasta. I love to use this type of pasta for ravioli and pappardelle so that you can see the beautiful pattern. I have also used it for lasagne, but it wasn’t really visible to the people eating it, it just added flavour.
Cooking the pasta
I don’t add salt to the pasta dough, but instead I add it to the water I am boiling the pasta in. Boil a big pan of water, and once it reaches the boil, add salt. I use a few teaspoons of salt so the water would be quite salty to taste, then add the pasta and boil it for about about 3–4 minutes, sometimes 4–5 minutes for filled or long pasta. It depends on the type of pasta you are cooking. When it floats to the top of the pan, usually around 3 minutes, I try a piece. If it tastes nice and al dente it is done, so drain it and serve.
I believe that a person’s passion for food is like a language that anyone with the same passions can understand.
Garnish with wild garlic
Wild Garlic Focaccia
For the dough
300 grams strong white bread flour
7g sachet of fast action yeast
5 grams salt
2 ½ to 3 Tbsp olive oil (see directions)
5 wild garlic leaves finely chopped (optional)
200 ml water
For the topping
Olive oil
Fine Semolina for dusting
Wild garlic leaves and flowers (optional)
Salt
Directions
Because this dough is very wet and hard to work with, I recommend using a stand mixer fitted with a dough hook. It can be made by hand but it will be quite messy.
1. Add flour into the bowl of a stand mixer.
2. Add dried yeast to one side of the bowl and the salt to the other.
3. Add 2 Tbsp of olive oil, the finely chopped wild garlic, half the water and turn on the mixer. Slowly add the rest of the water a little at a time, turn mixer to full speed, mix 3 minutes.
4. The dough will start off looking very wet and unworkable but as the gluten in the dough builds it will come together and stop sticking to the side of the bowl. Add the last ½ Tbsp of oil a little at a time (if the dough can take it, you can add a full Tbsp; it depends on how dry your flour was to start with), and knead for a further 2–3 minutes until you have a wet, but manageable dough that no longer sticks to the bowl while it is kneading.
5. Turn mixer off and oil your hands. Stretch dough 4 or 5 times to check the gluten has formed enough. I hold the dough and let its weight pull downward on itself, then fold in half and do the same again a few times to stretch it. Generously pour some oil into bowl and place dough in. Cover with plastic wrap or damp tea towel. Leave to rise in a draft-free place for 1 hour until doubled in size.
6. Line a large rectangle baking tray with baking paper and sprinkle over some fine semolina. Tip the bowl straight onto it, trying not to knock any air out, gently pull the dough into a large rectangle that fills the tray.
7. Leave to rise again for 1 hour in a draft-free place. I place it in a cold oven with the door closed, but if you have a large bag you can place the tray in it, making sure it doesn’t touch the dough.
8. Preheat the oven to 220˚C (if using the wild garlic you can use a slightly lower temperature and bake for a little longer).
9. Sprinkle a little Semolina onto the dough.
10. Using oiled fingers, press indentations into the dough. Then place on some wild garlic leaves and drizzle over some olive oil and flaked salt. (Another good way for equal saltiness is to mix 4 Tbsp water, 4 Tbsp oil and 1 tsp salt, when salt has dissolved drizzle it over and bake). Otherwise just use olive oil and some flaked salt.
11. Bake 20 minutes, until golden and hollow-sounding when tapped on the base.
The herbs will turn brown and shrink in the oven, but will be wonderfully crispy and really delicious. If you can’t find any wild garlic, you can use Ramps or herbs instead like some chopped rosemary or thyme or chives. But the dough on its own with some good olive oil and salt is delicious.
Related Stories
Growing up in a little town in Devon, surrounded by the sea on one side and the countryside on the other, was quite idyllic. Being the only girl in a family of boys meant I was a bit of a tomboy. We spent most of our time outside, climbing trees, exploring, or on the beach. When we finally ventured inside after a long day of playing in the garden, I loved to be in the kitchen with my mum for some girl time. Funnily enough, most of my fondest memories involve food.
Food has always been a very special part of my family, whether it was my nan’s giant portion sizes that we all admired or the big family dinners we had. It was always fun to see if we could all squeeze around the dining table and enjoy my mum’s famous roast dinners on a Sunday. After locating several spare chairs from around the house and garden, we managed to just fit around it elbow to elbow. I feel quite lucky that I have a very close relationship with my family.
I once took a cooking class in Italy, and the teacher didn’t speak any English and I could not speak any Italian. It didn’t matter at all; we both spoke fluently with our love for food, and were able to communicate perfectly with just that.
I connect with people through food every day, whether it is with photos of things I am making or the food I actually prepare for people to eat.
I often think about that experience and it has made me realize that people’s love for food is like a language—you don’t need words. Finding my passion for cooking and photography has changed my life, as I get to do something I am passionate about every day. I had always had a bit of a love/hate relationship with food and my weight, so learning to cook changed my mindset.
My passion for cooking really came into its own when I was working as a caregiver for a woman with Parkinson’s disease. It was quite a demanding job, and I needed something to do in my spare time to unwind and relax. I had always been creative, and initially I started a blog to share craft tutorials.
But in 2013 I discovered baking and I never looked back. Because I had to take photos of the things I had created for my blog, I started teaching myself how to take photos and experimenting. I soon fell in love with photography. I love to create photos that tell a story.
I spend every day cooking or taking photos and creating or planning the next thing I want to make or photograph. It’s meant that I can work from home, travel the world and meet so many wonderful people.
I think my passion for cooking happened the first time I cooked a meal for my family and they enjoyed it. Seeing the smile on their faces as they ate it brought me so much joy. There is something so therapeutic about cooking and creating. I just love being able to share the things I make with the people I love.
I don’t need to use words to convey passion, it seeps out of a person and into what they create for everyone to see.
My love for photography started as a necessity, but soon turned into a passion. I’m not a great writer, but I love to tell stories, so being able to do that with my photos in a visual form is so fun.
I don’t know why, but I always feel it’s wrong to say I am a self-taught baker and photographer. I learnt through trial and error; seeing things other people had done and then trying it myself. I taught myself most of what I know today, and it took a long time. That’s one of the reasons I started teaching workshops–I wish I could have attended one when I was starting out.
Foraging wild fennel
I enjoy being able to share everything I have learnt over the years, and maybe make that journey a bit easier for others. I love developing recipes and experimenting in the kitchen. I tend to have several base recipes and then constantly adapt them. Watching baking shows like The Great British Bake Off taught me so many techniques that I then took into my own kitchen.
I love to sketch out my ideas in a little notebook. I carry it with me everywhere, as I find that I will suddenly get an idea and need to write it down right away. Then I will go and research that idea further and look for inspiration. I usually sketch it a few times to get the idea exactly how I want it, then I start creating. It’s so fun to bring my ideas to life.
I often do this for shoots too and plan out the scenes first. Sometimes I create things out of the blue with no plan, but a lot of the time there has been a fair amount of thought behind it. I try to think of the things I create as a visual story, so I like to use the tones and light in my photos to help create a mood. I also love to use a human element in my photos.
I find inspiration in so many places, but most of all in nature. I also find that old paintings have really inspired my style. The use of light and shadow in Rembrandt paintings is something I try to achieve in my photos. I love looking on Pinterest and Instagram and seeing things other people have created too.
Foraging wild garlic
I am a bit of a magpie and have accumulated a huge collection of props over the years. I love to buy vintage things, as I feel like they have a story and have so much character. I am quite sentimental, and I remember where and when I got almost everything in my collection.
I have quite a few favorites though; it’s hard to pick just one.
When the algorithm on Instagram was initially implemented, I found it a struggle at first. I felt so creatively restrained and had to be like a sheep and do the same as everyone else. Last year I taught at the Forage Feast Photography workshop in Provence hosted by Ruth Ribeaucourt. At the workshop we discussed Instagram, and one of the other teachers, Valeria Necchio, said the most inspiring things. It completely changed everything for me.
I felt like I was only creating content that would look nice on the grid or not get hidden by the algorithm. I realized that it makes you lose your creativity and your authenticity when you think like that. I felt like I was losing mine. After I got home from that trip, I stopped worrying and started creating things that I wanted to create, and it’s changed everything. I now find that I am more creative than ever. I don’t find that the algorithm stops me now; in fact I find it has made me more creative. I have to think outside the box and create things that are a little different, and it spurs me on.
I find that my biggest creative struggle is that I often oversaturate myself with too much inspiration, and sometimes I feel a huge overwhelm. I will have too many ideas and then not know where to start, and then end up doing nothing. I go through phases when I am really inspired and then have spells when I am lost for ideas. I find that a break doing something completely different or walking the dog in the woods soon sorts that out.
I love using fennel pollen in recipes because it is packed with flavour. The little yellow flowers that appear during the summer months are culinary gems. We often go out to pick the wild fennel pollen that grows along the cliff near my house. We come home laden with the flowers. I let it sit in water for a few days in a small vase over some newspaper, then I gently rub the pollen off.
The flavour is a little more intense than the fennel seeds which appear on the plants a few weeks later. I go back and collect those too, and use them in my recipes. Aniseed-like scents fill the air when you come across a patch of the fennel growing wild; the spicy yet floral smell makes it easy to sniff out these flowers from afar.
Fennel pollen is often thought of as a luxury—after the pollen is collected, the tiny heads of wild fennel flowers are picked off and dried, making a powder-like spice. It has a sweeter and more intense flavour than fennel seeds, meaning that a little goes a long way. The smallest pinch of wild fennel pollen can transform a dish with heavenly, honey-aniseed flavours.
It can be a very expensive spice to buy, so I love to make the most of the season and collect some myself. Like saffron, it is quite labour intensive, so it means that it’s almost worth its weight in gold. After I have collected the tiny pollen heads I store them in an airtight jar to use throughout the year. When it’s time to collect the fennel seeds, I simply just cut the seed pods off and then gently shake it, and the seeds drop straight off.
Prepping fennel for recipe
Fennel Pollen, Honey and Ricotta Ice Cream Baked Alaska
I know the idea of fennel pollen ice cream might sound a bit odd, but the warm aniseed-like flavours go so wonderfully with the creaminess of the ricotta ice cream base. The delicious ice cream sits on top of a feather-light almond flour sponge and is covered in a silky toasted meringue. This Baked Alaska is my spin on a retro classic.
Ingredients
For the Ice cream
egg yolks
150 ml runny honey
2 Tbsp brown sugar
300 ml whole milk
250 ml double cream
250 grams ricotta
1 tsp fennel blossom (plus more to your taste)(alternatively use ground fennel seeds)
½ tsp ground fennel seeds
½ tsp vanilla bean paste
For the Almond sponge
4 eggs, separated
150 grams caster sugar (plus 2 Tbsp)
½ tsp salt
1 tsp vanilla extract or vanilla bean paste
150 grams ground almonds
1 ½ tsp baking powder
For the Meringue
4 egg whites
200 grams caster sugar
½ tsp cream of tartar
Instructions
Make the ice cream
1. In saucepan whisk together egg yolks, honey and sugar, then mix in milk, cream and ricotta. Add fennel pollen, ground fennel seeds and vanilla. Stir constantly over medium heat until it thickens and becomes like custard.
2. Pour through sieve to remove any bits of fennel seeds. Place a layer of plastic wrap over custard and let cool, chill overnight in fridge. Or use the pre-chill function on an ice cream machine. Pour into ice cream machine to churn, then pour into a small bowl or mould lined with cling film and freeze.
Make the sponge
1. Preheat the oven to 160˚C. Grease and line a small cake tin that is the same size as the bowl you used for your ice cream. Separate eggs, add egg whites into the bowl of stand mixer fitted with balloon whisk attachment and start mixing at medium speed. Once it starts to thicken, add sugar a little at a time, reserving 3 Tbsp. Turn up the speed and beat for a few minutes until stiff peaks form and you have a meringue-like mixture.
2. In another bowl, mix yolks, 3 Tbsp sugar, salt, vanilla, almonds and baking powder. Take ¼ cup of meringue mixture and mix into it to loosen it, then add yolk mixture to meringue ⅓ cup at a time and gently fold in. Pour into cake tin. (I had enough to fill two tins so I saved the extra sponge for something else.) Bake 25–30 minutes. Let cool.
Make the meringue
1. Add egg whites in the bowl of stand mixer and start whipping. Once the mixture is bubbly and pale, add the sugar a little at a time, along with the cream of tartar, then turn up to high speed. Whip 5 minutes or until stiff peaks form.
2. Place ice cream on top of cake, then spread over the meringue so there are no gaps. Now blow touch it or bake in a preheated oven at 180˚C for 5 minutes. Serve immediately.
Edible flower pasta is made by laminating flowers or herbs between two pieces of dough. It’s an easy step that creates the most beautiful pasta, but that’s not all; the flowers and herbs can add flavour too. I love how the flowers look when you hold the pasta up to the light; they create a beautiful mosaic of colour like a painting.
Stained glass pasta with edible flowers or herbs
It’s almost like a work of art, you never know how it will look and each time it is different. Not only is this pasta great to eat, but it’s probably one of my favourite pastas to take photos of.
There are a few things to think about before you make this pasta, but overall it is really easy to make.
My top tip would be choosing herbs and flowers with thin leaves; remember that it is being pressed between two layers of pasta so the flatter and thinner it is, the better.
Herbs
The best herbs to use are soft leaved herbs like basil, dill, mint or oregano. This is because the leaves are going to roll through the machine and stretch easily, and these are flat.
Woody herbs like rosemary and thyme will tear the pasta dough so I wouldn’t recommend them for this. I have also made it with small spinach leaves, which worked well. Cut the stems off any of the herbs first.
Edible flowers
Flowers look so beautiful in the dough and make the pasta so colourful. There are a lot to choose from!
Pansies, violas, marigold petals, corn flower petals, dianthus, nasturtium, calendula and primroses are my favourite varieties to use, but other edible flowers are fine as long as the petals are thin. You can use whole pansies, primroses and violas if you carefully remove the stems; for the other flowers I mentioned I tend to just use the petals.
Herbs and flowers don’t just add colour but also flavor. A lot of edible flowers actually have quite a lot of flavour; some are really peppery, which is perfect for savoury recipes.
Make sure you use organic unsprayed flowers and herbs. I use violas and pansies most often as we have them in the garden, but you can order fresh-cut edible flowers now. I use herbs from the garden or the supermarket.
How to make it
1. Roll out the pasta sheet to as thin as you normally would so you have a nice thin long sheet. (Number 7 on my pasta machine seems to be the ideal thickness for me, but your machine may be different, so just go as thin as you can without the dough tearing). Then with a brush add little dots of water where you want to add the herbs or flowers and press on.
2. Space them out over half of the pasta sheet, remembering that they will stretch and change size, and then fold the other half of dough over and press together. Turn the pasta machine back up to two thicknesses wider than the one it was last rolled through before you added the herbs/flowers (number 5 on my machine) and roll through. Then turn it down to the next thickness and roll through again until it is nice and thin.
NOTE: The herbs/flowers will break up and stretch with the pressure of being rolled, so it can create some really amazing looking pasta. I love to use this type of pasta for ravioli and pappardelle so that you can see the beautiful pattern. I have also used it for lasagne, but it wasn’t really visible to the people eating it, it just added flavour.
Cooking the pasta
I don’t add salt to the pasta dough, but instead I add it to the water I am boiling the pasta in. Boil a big pan of water, and once it reaches the boil, add salt. I use a few teaspoons of salt so the water would be quite salty to taste, then add the pasta and boil it for about about 3–4 minutes, sometimes 4–5 minutes for filled or long pasta. It depends on the type of pasta you are cooking. When it floats to the top of the pan, usually around 3 minutes, I try a piece. If it tastes nice and al dente it is done, so drain it and serve.
I believe that a person’s passion for food is like a language that anyone with the same passions can understand.
Garnish with wild garlic
Wild Garlic Focaccia
For the dough
300 grams strong white bread flour
7g sachet of fast action yeast
5 grams salt
2 ½ to 3 Tbsp olive oil (see directions)
5 wild garlic leaves finely chopped (optional)
200 ml water
For the topping
Olive oil
Fine Semolina for dusting
Wild garlic leaves and flowers (optional)
Salt
Directions
Because this dough is very wet and hard to work with, I recommend using a stand mixer fitted with a dough hook. It can be made by hand but it will be quite messy.
1. Add flour into the bowl of a stand mixer.
2. Add dried yeast to one side of the bowl and the salt to the other.
3. Add 2 Tbsp of olive oil, the finely chopped wild garlic, half the water and turn on the mixer. Slowly add the rest of the water a little at a time, turn mixer to full speed, mix 3 minutes.
4. The dough will start off looking very wet and unworkable but as the gluten in the dough builds it will come together and stop sticking to the side of the bowl. Add the last ½ Tbsp of oil a little at a time (if the dough can take it, you can add a full Tbsp; it depends on how dry your flour was to start with), and knead for a further 2–3 minutes until you have a wet, but manageable dough that no longer sticks to the bowl while it is kneading.
5. Turn mixer off and oil your hands. Stretch dough 4 or 5 times to check the gluten has formed enough. I hold the dough and let its weight pull downward on itself, then fold in half and do the same again a few times to stretch it. Generously pour some oil into bowl and place dough in. Cover with plastic wrap or damp tea towel. Leave to rise in a draft-free place for 1 hour until doubled in size.
6. Line a large rectangle baking tray with baking paper and sprinkle over some fine semolina. Tip the bowl straight onto it, trying not to knock any air out, gently pull the dough into a large rectangle that fills the tray.
7. Leave to rise again for 1 hour in a draft-free place. I place it in a cold oven with the door closed, but if you have a large bag you can place the tray in it, making sure it doesn’t touch the dough.
8. Preheat the oven to 220˚C (if using the wild garlic you can use a slightly lower temperature and bake for a little longer).
9. Sprinkle a little Semolina onto the dough.
10. Using oiled fingers, press indentations into the dough. Then place on some wild garlic leaves and drizzle over some olive oil and flaked salt. (Another good way for equal saltiness is to mix 4 Tbsp water, 4 Tbsp oil and 1 tsp salt, when salt has dissolved drizzle it over and bake). Otherwise just use olive oil and some flaked salt.
11. Bake 20 minutes, until golden and hollow-sounding when tapped on the base.
The herbs will turn brown and shrink in the oven, but will be wonderfully crispy and really delicious. If you can’t find any wild garlic, you can use Ramps or herbs instead like some chopped rosemary or thyme or chives. But the dough on its own with some good olive oil and salt is delicious.
The Women Create Foundation is a catalyst for small but significant strides to empower women creators through grants that help bring projects to life and foster innovation.