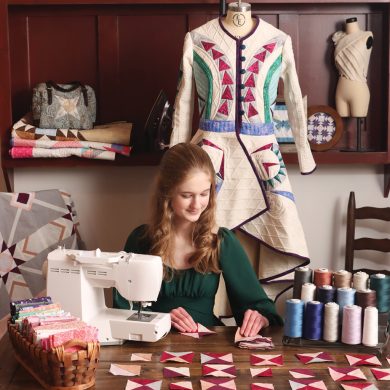
When I was a little girl, I had big crazy dreams for myself. I envisioned being a cowgirl at the rodeo. I wore red cowgirl boots and a straw cowboy hat with green trim everywhere. As I grew up, the idea of what I wanted to do with my life changed. While there were many different career paths envisioned and tested, I’m not sure I ever saw myself running an embroidery-based small business. In fact, when I got back into hand embroidery as an adult, my mom’s first words to me were, “You hated that as a kid!”
Growing up in eastern Washington, my mom kept my sisters and me busy with all sorts of crafts. We tried everything from crazy quilting to bobbin lace to embroidery to papier-mâché. Later in high school, my mom helped me design and sew dresses for school dances. While I didn’t love all these crafts, I really appreciate my mom helping me build new skills and the mentality that I could always give something a try. I didn’t have to be good at it, I just had to try.
After graduating college and entering the workforce, I found myself sitting behind a computer all day and making nothing tangible. I missed creating with my hands. I missed the tactile experience of making. After some trial and error, I found hand embroidery again and quickly fell in love. It reminded me of my childhood love of coloring but with a needle and thread.
I stitched so much that it quickly became apparent I either needed to gift my creations, sell them, or find something else to do. As I’m sure you guessed, I ended up starting a small business. Did I know where this would lead or what I was getting into? Absolutely not!
Over the years I’ve learned a lot about what I want to do and don’t want to do within this creative space. While I originally started out selling my embroidered art, I found that I enjoyed teaching and sharing my craft with fellow makers more. Now, I design nature-inspired hand embroidery kits, teach hands-on workshops, and am the author of multiple hand embroidery books. Cowgirl me would have never imagined this was possible. Sometimes I even wonder if this is real life too.
Every year I set a few goals for myself on what I want to achieve. It started with embroidery kits, then hands-on workshops, then adding different skill level kits, then figuring out how to write an embroidery book and getting myself published, then how to exhibit at trade shows, and writing more embroidery books.
When I say goals, I mean starting from scratch. While I had the idea of writing a book, I had no idea where to begin or how to even get started. I didn’t have a publisher reach out to me or work with an agent to help me land a publishing deal. Instead, I did it with a lot of research, hard work, waiting and rejection, until I finally had someone take a chance on me and say yes.
My first book, How to Embroider Texture and Pattern, features 20 landscape embroideries filled with texture, pattern, and 3D stitching. I loved the process of creating a curated collection of work and pulling from my travel experiences. Many of the pieces tell stories of travel to tropical locations, arid deserts and cross-country road trips. After submitting the manuscript for my first book, I knew I wanted to write another. I gave myself some time and breathing room to think through what would be next before pitching a new idea to my editor.
In Fall 2024, my second book—DIY Embroidered Shoes—was published. Funnily enough, I didn’t think I would be creating a book about stitching on shoes. When I first pitched the idea to my editor, I wanted to showcase upcycling clothing with hand embroidery. I love upcycling my own clothing, adding unique embellishments and covering small stains and holes with embroidery. Adding embroidery makes the piece uniquely mine and gives some pizzazz to my relatively basic wardrobe. As part of my idea pitch, I sent in photos of a few embroidery projects, including pairs of shoes, as examples for potential inclusions for the book. After some ideating and stitching of more examples, we eventually moved forward with the shoe embroidery concept.
Once the idea was approved, my editor and I agreed on a certain number of projects and a desired book length. DIY Embroidered Shoes features 13 canvas shoe embroideries, 2 espadrille shoe patterns and 50 additional mix-and-match patterns, many of which tie into the other projects in the book.
When designing patterns, I love to go old-school with a pencil and grid paper. I start small with thumbnail sketches, often pulling inspiration from photos of interesting nature finds from neighborhood walks with my pups or from family vacations. I’ll envision an idea and draw multiple small sketches. From there, I like to pick one idea and enlarge it to size to see if it needs more detail or adjustments before moving forward.
As I created the shoe collection for my book, I worked in batches. This helped me feel less overwhelmed by all the projects and stitching that needed to be completed, as well as not overwork my hands. I quickly found out that my hands are not cut out for stitching on tons of pairs of shoes. This realization also helped me find tools and tips I would be able to recommend to readers when they stitched their own pairs of shoes.
After sketching, I start embroidering. Usually, when drawing out a pattern, I envision colors and stitches to create different textures and movement. I love pulling out different threads and fabrics to bring my vision to life. When embroidering a design, I try to stay close to the sketch, however, I sometimes make changes based on types of stitches, flow, and spacing. I love creating designs with rich texture and a wide variety of stitches. As I work, I take notes on the stitch, thread and number of strands to use later when writing the detailed pattern.
Thankfully, my editor gave me free rein on designs for the shoes. As I worked through ideas, I would put the shoes together on a bookshelf. Seeing them laid out as a collection helped me figure out where I could add certain concepts or elements that would help the collection feel cohesive.
After each embroidery is completed, I create a digital design from the stitched pattern. (Still can’t get away from computers, even in the fiber arts!) I use Adobe Photoshop to digitize my embroidery, creating a linework pattern from the stitched sample. With the digitized design,
I create a pattern and sometimes use it with my notes to stitch a second sample. Sometimes I’m much more into the stitching than documenting the process and if that happens, I embroider the design a second time with photos and detailed notes for the instructions. Though I write patterns for a living, I don’t enjoy following one when recreating one of my designs.
When writing patterns and teaching workshops, I want to include as many useful tips as possible to help anyone new or seasoned have the best experience embroidering. While my mom gave me a good foundation in crafting, I didn’t remember much about hand embroidery when I picked back up as an adult. Much of what I know now I taught myself through books, YouTube, and trial and error. I love learning new stitches and sometimes will learn a stitch before I know the name. This happened with the sheaf stitch and until I could figure out what it was called, I dubbed it the butterfly stitch.
My favorite part of teaching hands-on workshops is seeing that aha moment light up someone’s face. This often happens when I show people how to create the quilter’s knot. This is a knot I often use at the end of my thread before starting to embroider. The process is a bit like magic. My friend Rosalie and I like to joke that it’s our go-to party trick.
Embroidery is a relaxing and creative outlet. About three years ago, I quit my corporate day job and took my small business full time. And even now, it’s hard to imagine this is what I do for a living. It feels like play. Yes, there are serious and necessary things to do, like taxes, payroll and event applications, but in general, I love waking up every day and being able to be creative and share that creativity with other makers.