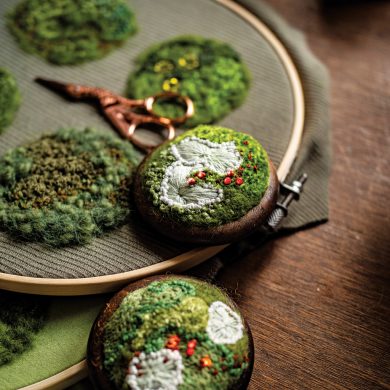
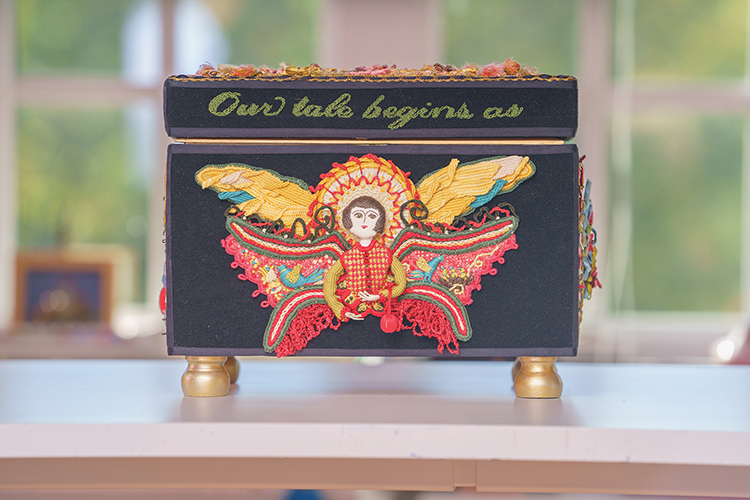
Become a member and get exclusive access to articles, videos and more!
Start Your Free Trial

This is the 1st of your 3 free articles

Become a member for unlimited website access and more.

FREE TRIAL Available!

Already a member? Sign in to continue reading

Janet Carija Brandt

Published:

Needing Needlework

I remember the first time I saw a skein of embroidery floss. I was 5, maybe 6, and standing in front of the thread counter at Kresge’s. It was a yellow-orange shade of thread and I wanted it so badly. A skein of floss gives me the same thrill today.

I am a self-taught embroiderer with lots of bad habits. I only learned about these stitching no-nos, like licking my thread and putting knots on the back of my work, in the last 10 to 15 years. I’m glad I didn’t know sooner. Too many rules.

My first embroidery attempts were kits. They were great because all the materials were included and there were so many new stitches to learn.

I grew up in Gary, Indiana, a melting pot of Eastern European communities. I have loved folk embroideries and the embroideries of my Croatian heritage all my life.

My parents owned a women’s clothing store. I did fashion illustrations, dressed windows, and planned back-to-school fashion shows. And to think none of that exists anymore. … But I loved it all.

The best part of Gary was having Chicago a short train ride away. The Chicago Art Institute was free and empty. Brentano’s bookstore on Wabash had a great art and architecture department.

Architecture was my first real detour from embroidery. I had originally planned to study weaving and textiles but switched majors and colleges at the last minute. I did stitch during those years, but as the only woman in the class I had to do it on the sly. It was considered too girly. Of course, the best part of my college years was meeting my husband. He has been my greatest stitching supporter ever since.

The next decades pass in a blur of detours called marriage, children, and a huge variety of freelance jobs in graphic design and architectural model building. I made my first doll after our daughter was born. I’m still making them. I passed through a period of wearable art and rug hooking. Rug hooking was too labor-intensive for me, so I decided to combine the wool fabric I was using for rugs with my love for embroidery.

It led to my first book, WOW! Wool-on-Wool Folk Art Quilts. I enjoyed writing and designing for books, magazines and manufacturers. It was the perfect work-from-home job. More books followed and more embroidery was incorporated into the quilts. My last book was about the creative process in each and every one of us.

I explored digitized embroidery and created an entire collection of ethnic dolls using digitized embroidery to stitch everything from the body shapes to the costumes. And then it was time for architecture again — only on a miniature scale. I decided to remodel the dollhouse I had made for our daughter so many years before. This was the beginning of the Red House, Once Upon A Time and The World of Possibilities, an all-new embroidery journey that took a very unexpected form.

The Casket Journey

Casket is a 17th-century word for box. In the 1600s, these boxes were covered with lavish 3D embroideries in a technique then-called “raised embroidery,” but now called stumpwork by many. I saw my first embroidered casket at the Victoria and Albert Museum as a college student studying in London. It was love at first sight. It was also a very long time ago (1974)!

The materials and shapes for this type of embroidery were reintroduced by Tricia Wilson Nguyen and her company Thistle Threads for the first time in almost 400 years. I knew I wanted to create my own story to go on my own casket. That is, casket singular. I never imagined I would eventually create four very different ones!

I found Tricia’s website quite by accident. I was already experimenting with raised embroidery, but here was a class telling me about those wonderful embroidered boxes like the ones I had seen at the V&A all those years before.

Tricia was offering a class that included an in-depth history of 17th-century raised embroidery, hundreds of detailed reference photos, all the step-by-step stitch instructions and — best of all — threads, trims and the unique boxes, available for the first time in 400 years. The first offering of the Cabinet of Curiosities class was well underway. I signed up for the next class as soon as it was offered. That was 10 years ago.

In addition to covering the boxes, I created small dolls of the main characters, a theater, a castle crosssection, maps and extra illustrations to tell my story. The theme is the Golden Rule.

Of course, it takes place in the Golden Rule Mountains, with two kingdoms and two kings: the Dragon Prince who believes “he who has the gold rules,” and the Princely Dragon, who lives by “treat others as you want to be treated.”

I stitched my story using characters from fairy tales, nursery rhymes, fables, and my imagination. The outsides of the boxes are just the beginning. Inside you’ll find hidden drawers, secret compartments and expanding scenes. Visitors find something new each time they view my work.

My lifelong need for the tactile connection between me and the cloth explains why I do most of my embroidery “in hand” — meaning I don’t use a hoop or frame if I don’t have to. Working in hoops or frames serves an important function for many techniques and I use them when necessary. But I love the portability of working in hand.

Before I even started the casket classes, I had stacks of drawings with ideas, themes, characters and settings. I never had any intention of trying to reproduce a 17th-century casket. After years of designing my own quilts, rugs and embroideries, I knew this, too, would be my own design with lots of nods to the 17th century.

Telling a story in stitches takes a good deal of thought and planning. First, I had to decide on a focal point for each embroidery, which was usually a character. I would think about which moment in the story I wanted to show. Then, I planned the setting and all the little details to further the story along.

Meanwhile, I am always thinking about how I will actually stitch it. I pick which parts will be in raised embroidery and which parts will be flat and what stitches I will use to achieve those goals. The best step of all is choosing threads from a rainbow of colors and textures. So many possibilities each step of the way.

Most of the stitching for the caskets was done in silk with wool and cotton showing up as well. I had never stitched with silk before I started this project. For me, each fiber stitches so differently. Silk seems to beg to be precise. Or at least as precise as I am able to be. I find I work in a much looser style when I stitch in cotton or wool.

The Red House casket was designed to look like a home on the front. The sides feature different characters and places. The top shows a little girl named “Once” and her giant flying dog friend named “Time.” I used many of the same doll-making skills I had acquired over the years on the raised figures of the embroidered panels. I was honored to have this casket exhibited at Winterthur Museum for their 2018 needlework exhibit Embroidery: The Thread of History.

The Enchanted Forest is a 3D forest creation. The tree spirits and forest animals converge in a mossy clearing. Making sure the trees were stable and secure was a fun problem to solve. I documented my process in a YouTube video.

Fables to Go was me really stepping out of the traditional casket imagery. The abstract designs I call my “wander scapes” are environments I would love to travel through in real life. I chose to use detached buttonhole stitches throughout for two reasons. The colors are more intense, and I didn’t have to make all of the stitches through the fabric. (This was before I had my arthritic thumb rebuilt.) My animals were strongly influenced by Milo Winter’s 1919 version of Aesop’s Fables.

Creativity is one of the most powerful traits we possess. When we deprive children of arts programs, we aren’t taking away busy work. We are taking away a chance to learn problem-solving skills. Life is nothing but full-time problem-solving, so why not learn to do it creatively?

The last casket is about the cycle of a garden. One of the first 3D embroideries I created before I started the caskets was the Gardening Angel. I thought it fitting to put her on the last box. The rest of the box tells the origin story of the Dragon Prince and the Princely Dragon. Beginnings and endings coming full circle.

In between covering the caskets, I stitched dolls and their clothing and expanded the Red House dollhouse. The buildings now cover one wall of my studio. I enjoy making stages and their settings. It is a motif that appears over and over in my work. The largest stage is the Enchanted Forest stage. Presently, it holds small scale embroidered buildings of the village. The little people are antique German folk figures.

There is also a cross section of the Gold Castle ruled over by the Dragon Prince. It was fun to see how much detail I would be able to include at that scale. Quite a bit, it turns out! The entire image size is just 8 by 10 inches.

Process

The last step of creating a casket is mounting the embroideries onto the box. If you would like to try this process yourself, start with a simple wood box from any craft store.

Trace your embroidery design onto your fabric. My favorite stitching material is osnaburg. It is the very poor cousin of linen, but I like it. I like to use a fine point Uniball pen for tracing.

Have fun stitching your creation using any thread that makes you happy.

Remove hardware from the box and lightly sand inside and outside. I’m not going to use the hinges on the final box, so I fill the cutout area where the hinges were originally recessed. I use wooden coffee stirrers.

Cut the stirrers to size, stack them up, glue in place and when the glue is very dry, sand any rough edges. You might want to add feet to your box, so now is a good time to prime those. I thought about using either miniature wooden spools or small wood thimbles.

Traditional 17th-century boxes were first covered in paper. This is an important procedure uncovered by Tricia Wilson Nguyen during her years of research. She describes it in great detail, complete with videos, in her embroidery course. The paper provides a protected surface to adhere your embroidery.

Paste paper to the back of your embroidery. When super dry, you can cut it to fit the box. I choose to cover the lid of my box with embroidery and the lower sections with a coordinating fabric.

Any raw edges can be covered with ribbon or a decorative trim. Traditionally, edges were finished with a beautiful woven silver trim!

The Bottom Line

From an early age, I’ve felt I’ve had a charmed life. I have always seen possibilities around me. I have an amazing husband and family and I also have the daily opportunity to create. A needle with a little thread lets you create whole worlds. Enough truly is a feast.

Women Create Foundation

The Women Create Foundation is a catalyst for small but significant strides to empower women creators through grants that help bring projects to life and foster innovation.

Learn More