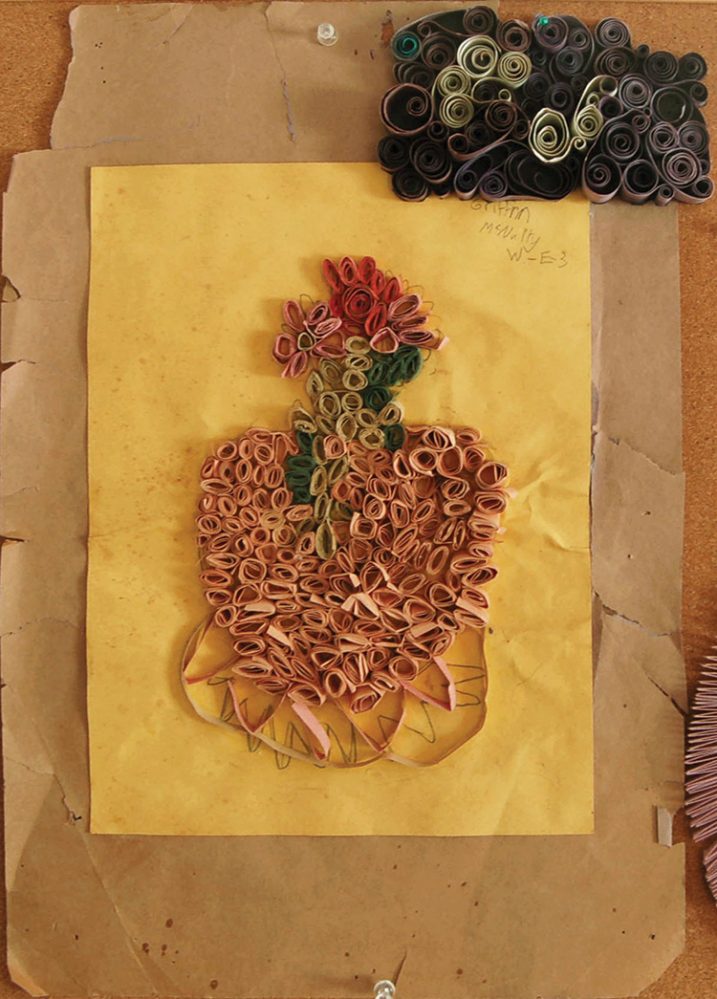
Paper quilling made its first appearance in my life in the third grade. I made a vase and flowers composed of rolled construction paper for a school art project. It would be another twenty years before I tried my hand at quilling, this time as a mom and military spouse in desperate need of a creative outlet.
During my quilling hiatus, I pursued my first creative passion, interior architecture. My childhood was spent perfecting the design of Barbie’s dream house in a spare bedroom that my parents and I affectionately nicknamed “The Barbie Room.” When I outgrew Barbie, I switched to drawing floor plans and redesigning the homes of friends and family. I learned the basics of drafting floor plans from my dad, who worked in kitchen and bathroom design. He would bring stacks of scrap paper home from work with floor plans and elevations on them, for me to draw on the backside. I inevitably took an interest in those drawings and began making my own. This passion for home design led me to study architecture in college followed by a master’s degree in interior design. I then spent the next 10 years working as an interior designer and teaching it to undergraduate students. In that time, I married my high school prom date, and his Army career moved us to Fayetteville, NC, where we welcomed our two older children.
I found myself home with our children, working remotely teaching design and decorating for residential clients part time, frequently solo-parenting for weeks or months at a time, as military spouses often do. By the summer of 2016, I was in desperate need of a creative outlet that was all my own. I needed something tangible to show at the end of those long and sometimes lonely days that inevitably occur in early motherhood and in military life. My design work, while creative, existed wholly on my computer and was an answer to my clients’ needs and wants, not my own and my kids’ playdough and finger paints just weren’t scratching the itch.
At the time, weaving and macrame wall hangings were seeing a comeback in home decor. I was frequently sourcing them for my clients because I loved the texture and sculptural qualities they brought to a room. I wanted my creative hobby to have the same qualities as macrame and weaving. I knew these particular crafts would require me to take some type of course to learn the basics, and that just wasn’t in the cards for me in that season of life. I needed something I could dive right into. That’s when I remembered making a textural piece of art, using only paper, way back in elementary school. If third-grade Griffin could roll paper, thirty-something Griffin certainly could too!
For my first “rolled paper” project, as an adult, I used what I had on hand, white printer paper, a paper trimmer, markers, a toothpick and Elmer’s glue. I colored the paper shades of green and blue, cut the sheet into strips, rolled the strips with my toothpick and glued the circular shapes to black construction paper. I cut away the excess black construction paper around the edges of the piece, resulting in a small mass of green and blue coils at varying heights. It wasn’t anything spectacular, but I enjoyed the process and saw lots of potential. I also learned, thanks to Google, that “rolled paper art” was actually called quilling, and had a long tradition dating back to nuns in the Renaissance.
The thing that bothered me about my first two attempts at paper quilling was the paper backing that the rolled shapes were attached to. Macrame and weaving do not require a backing; their rope and thread act as both the structure of the piece and its decoration. My years working as an interior designer ingrained in me the value of form and function working in tandem. My quilled art could not be only surface decoration, it also had to serve a function, as the structure too. The paper backing had to go!
I started gluing the quilled shapes to each other and switched from printer paper to cardstock for added stability. Now form and function were working hand in hand in my quillings and in turn mimicking the qualities I loved so much about textiles. I had found my creative outlet that quickly transformed into a full-blown art practice that is all about experimenting with paper quilling.
Early on, I leaned heavily on the influence of macrame, working with white cardstock, mimicking its monochromatic knot patterns with quilling.
When I started craving color in my work, I let Mother Nature and woven tapestries be my guide, as I depicted land or sea paired with sky in my quilled landscape tapestries. I used various quilling techniques to explore the many textures found in the landscape.
There came a point where my tapestries just weren’t sculptural enough for my liking, so I let pottery inspire the forms of my quilled paper vessels.
When I wanted to create more figurative work, collage was the answer. Using found images from thrifted books, I transformed how the original image was perceived using colorful quilled details.
My recent 30-day quilled collage challenge “Good Hair Day 2021”
While my art practice has been an on-going experiment in paper quilling, textiles have been a constant source of inspiration for me. That connection was solidified when I read “Women’s Work: The First 20,000 Years. Women, Cloth and Society in Early Times”. Author Elizabeth Wayland Barber noted the research of Judith Brown, who hypothesized why women of early civilizations were tasked with textile production for their families over the men. It came down to child rearing. She noted five primary reasons why mothering and textile production were so compatible. The creation of textiles was:
1 | repetitive
2 | interruptible
3 | easy to resume after interruption
4 | production didn’t put children in danger
5 | and it didn’t take the participant far from home
These were the very same reasons I latched on to paper quilling as my artistic medium of choice in the summer of 2016. This revelation led to my current body of work, large-scale quilled paper doilies. Using a material commonly associated with the doily, paper, I return it to its labor-intensive origins with quilling, rather than crochet or lace. My doilies are 3 times larger than life as a way for me to celebrate the long history of women’s domestic creative labor. This series also allows me to examine my own experiences as a woman, wife and mother and speaks to my lifelong interest in home design and decoration.
MY PROCESS
Research and Sketching
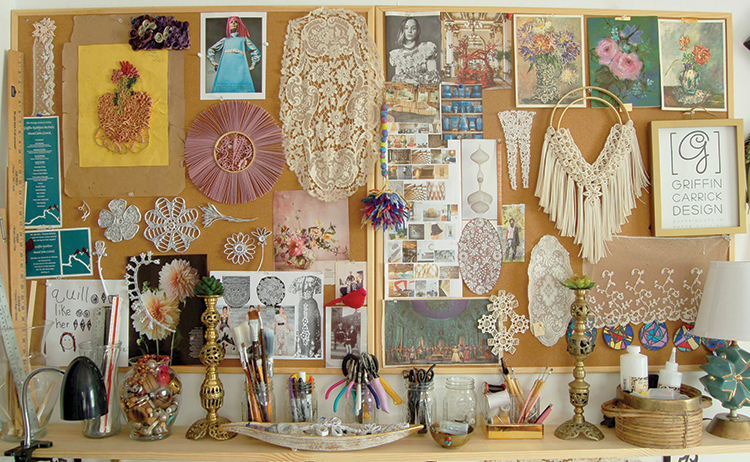
All of my quilled doilies start with research. I am always gathering images and information from books and the web about the history, techniques, and patterns traditionally used in lace making and crochet. I sketch patterns and motifs along the way that I feel best translate into quilling. My favorite form of research is visiting thrift and antique shops to see and feel doilies and other crochet and lace remnants in person.
For this particular project, I wanted to create a round flower petal doily that utilized a diamond netting. I sketched a few ideas in my notebook that I referenced as I worked through the design.
Template
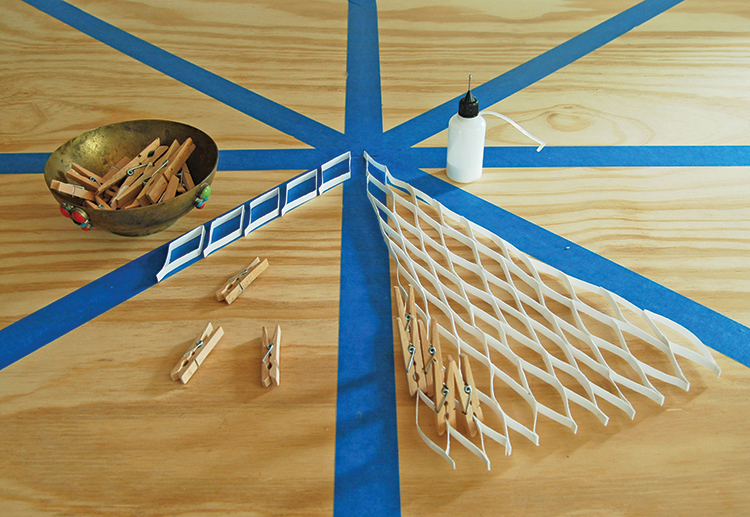
Once a basic design is sketched in my notebook, I create a template on my desktop, using blue painter’s tape. For this project, I laid out eight arms that radiate from the middle, and I marked the 18″ radius on all 8 arms to ensure my final doily was 3 feet in diameter. This template gives a basic guide to create the overall composition while allowing freedom to play with the design as I work. Too much rigidity about the final outcome at the start of a project takes the fun out of the process. An art practice based in experimentation means leaving plenty of room to adjust as I go. I always start with a plan but have found that not every idea works in practice, and sometimes the best solutions pop up as I go.
Production and Assembly
All of my quillings contain hundreds of individual quilled shapes made from strips of paper that are individually folded, rolled or curled, and then assembled into larger motifs. Those motifs are then assembled into an overall larger composition. I find I am constantly moving back and forth between production and assembly, and I prefer it this way, as it breaks things up.
Production
The production process starts with the shredding of paper, lots of paper, into 1⁄4″ × 11.5″ strips. I usually shred about five sheets at a time and return to shred more as I go.
Once my paper is shredded, it is on to the production of the individual quilled shapes. Curling up on the sofa with a binge-worthy TV series is the perfect setting for this step, as rolling and folding hundreds of strips of paper can get quite boring.
Most of my quilled doilies contain just 2–4 different quilled shapes. Limiting the number of shapes speaks to crochet and lace making which rely on just a few different stitches to create more complex compositions. For this doily I used four different quilled shapes (Shown in the image below from left to right): Folded Teardrop, Folded Heart, Folded Diamond, and Rolled-Eye.
TOOLS
Quilting Tool | I found this particular quilling tool in our house, built in 1941, while I was pulling up the carpeting on our stairs. I love the idea that the previous owner may have also been a quiller like me.
Glue | I use a PH Neutral and PVA glue that I put in a small needle tip glue bottle for more precise application.
Scissors
Cardstock | I prefer white 65lb 8.5″× 11″ cardstock.
Strip Paper Shredder | This is the ultimate quilling hack! Creating large-scale quillings means I need
A LOT of paper strips. Strip paper shredders cut sheets into 1⁄4″ wide strips that are 11.5″ long. Occasionally a design will call for thicker or thinner strips of paper and when they do, I get out my rotary paper cutter.
Painter’s Tape | Perfect for creating templates on my desktop that can later be removed without damaging the tabletop.
Parchment Paper | This also makes an excellent template. Its waxy surface ensures the quilling won’t easily stick to it.
Mini Wooden Clothespins | Hold quilled shapes in place while the glue dries.
Hands | Perhaps the most important tool of all (and free!).
HERE’S HOW I MADE EACH SHAPE
Folded Teardrop Shape
Using a quarter-length strip of card stock I glued the ends together, without creasing the paper, to create a teardrop shape.
Folded Heart Shape
With a half-length strip of card stock, I folded and creased the strip in half, then folded in the ends, without creasing it, to create a heart shape, gluing where the ends meet.
Folded Diamond Shape
Using a half-length strip of card stock, I folded and creased the strip in half, gluing the ends together. Then I squeezed the creased point and the glued end together, creasing the bulging sides, to create a diamond shape.
Rolled-Eye Shape
Using a full-length strip of card stock, I rolled it using my quilling tool into a circle shape the size of a dime. This ensures size consistency. I then pinched opposite sides of the circle to create an eye shape.
ASSEMBLY
After a hefty pile of my various quilled shapes has been created, it’s on to the assembly of the shapes into motif. This doily consisted of just two different motifs: Flower Petal and Diamond Netting.
Flower Petal Motif
To make the Flower Petal Motif, I created a template with parchment paper, to ensure size consistency. I then assembled and glued 13 alternating rows with the Rolled-Eye Shape and Folded Teardrop Shape.
Diamond Netting Motif
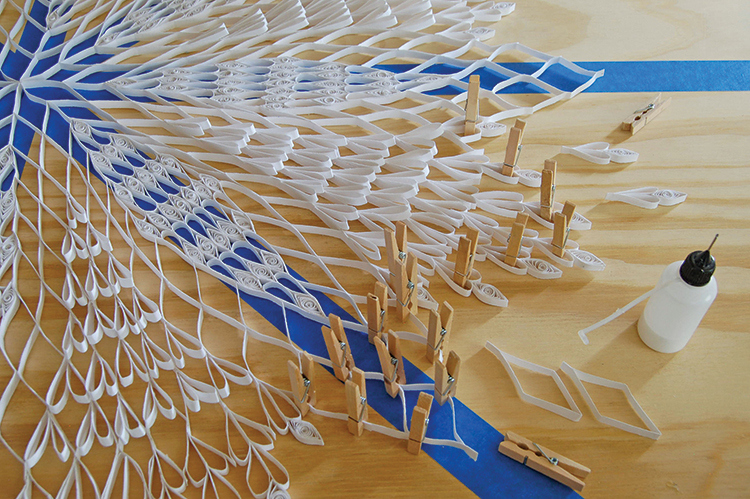
Lace and crochet often rely on a netting to fill the areas between more decorative motifs. For this doily I created my own quilled netting by gluing 55 Folded Diamond Shapes together into a larger triangular shape.
Then it’s back to production mode as I had to repeat the Flower Petal Motif and Diamond Netting Motif eight times each.
With eight Flower Petal Motifs and eight sections of the Diamond Netting made, I began arranging them on my desktop template. I placed the Flower Petal Motifs on the 8 radiating arms of my template, inserting the netting between them. I then glued them together and used mini clothespins to hold everything together while it dried. The resulting shape was a circle with an 8 pointed star in the middle.
Adding Texture
I love adding details to my quillings that cannot be as easily achieved with crochet or lace-making techniques. For this piece, I added texture by inserting the Folded Heart Shape at roughly a 45-degree angle into the Diamond Netting sections of the doily, leaving two rows of diamond netting open on either side of the Flower Petal Motif.
Final Details
Now, with 16 arms radiating from the middle of my doily, alternating between the Flower Petal Motif and the newly textured Diamond Netting Motifs, I then tapered each of these 16 arms to a point, so each resembled a flower petal and the whole doily looks like a giant flower.
I added six Folded Diamond Shapes to the end of each of the eight Flower Petal Motif arms, so each was fully surrounded by the diamond netting. For the eight textured Diamond Netting sections of the piece, I tapered them off with Folded Hearts to create the petal shape that I then finished off with the Rolled-Eye Shape.
For display purposes, I tie my finished doilies to black indoor-outdoor fabric with thread and needle and suspend it from a wall mounted curtain rod. But before I do this, I love to take my doilies outside to photograph them amongst natural and architectural elements. Taking these doilies out of the domestic setting helps recontextualize them, expanding appreciation for the domestic creative labor of women, the benefits reaching far beyond the four walls of the home.
THE JOURNEY
Paper quilling made its first appearance in my life in the third grade. I made a vase and flowers composed of rolled construction paper for a school art project. It would be another twenty years before I tried my hand at quilling, this time as a mom and military spouse in desperate need of a creative outlet.
During my quilling hiatus, I pursued my first creative passion, interior architecture. My childhood was spent perfecting the design of Barbie’s dream house in a spare bedroom that my parents and I affectionately nicknamed “The Barbie Room.” When I outgrew Barbie, I switched to drawing floor plans and redesigning the homes of friends and family. I learned the basics of drafting floor plans from my dad, who worked in kitchen and bathroom design. He would bring stacks of scrap paper home from work with floor plans and elevations on them, for me to draw on the backside. I inevitably took an interest in those drawings and began making my own. This passion for home design led me to study architecture in college followed by a master’s degree in interior design. I then spent the next 10 years working as an interior designer and teaching it to undergraduate students. In that time, I married my high school prom date, and his Army career moved us to Fayetteville, NC, where we welcomed our two older children.
I found myself home with our children, working remotely teaching design and decorating for residential clients part time, frequently solo-parenting for weeks or months at a time, as military spouses often do. By the summer of 2016, I was in desperate need of a creative outlet that was all my own. I needed something tangible to show at the end of those long and sometimes lonely days that inevitably occur in early motherhood and in military life. My design work, while creative, existed wholly on my computer and was an answer to my clients’ needs and wants, not my own and my kids’ playdough and finger paints just weren’t scratching the itch.
At the time, weaving and macrame wall hangings were seeing a comeback in home decor. I was frequently sourcing them for my clients because I loved the texture and sculptural qualities they brought to a room. I wanted my creative hobby to have the same qualities as macrame and weaving. I knew these particular crafts would require me to take some type of course to learn the basics, and that just wasn’t in the cards for me in that season of life. I needed something I could dive right into. That’s when I remembered making a textural piece of art, using only paper, way back in elementary school. If third-grade Griffin could roll paper, thirty-something Griffin certainly could too!
For my first “rolled paper” project, as an adult, I used what I had on hand, white printer paper, a paper trimmer, markers, a toothpick and Elmer’s glue. I colored the paper shades of green and blue, cut the sheet into strips, rolled the strips with my toothpick and glued the circular shapes to black construction paper. I cut away the excess black construction paper around the edges of the piece, resulting in a small mass of green and blue coils at varying heights. It wasn’t anything spectacular, but I enjoyed the process and saw lots of potential. I also learned, thanks to Google, that “rolled paper art” was actually called quilling, and had a long tradition dating back to nuns in the Renaissance.
The thing that bothered me about my first two attempts at paper quilling was the paper backing that the rolled shapes were attached to. Macrame and weaving do not require a backing; their rope and thread act as both the structure of the piece and its decoration. My years working as an interior designer ingrained in me the value of form and function working in tandem. My quilled art could not be only surface decoration, it also had to serve a function, as the structure too. The paper backing had to go!
I started gluing the quilled shapes to each other and switched from printer paper to cardstock for added stability. Now form and function were working hand in hand in my quillings and in turn mimicking the qualities I loved so much about textiles. I had found my creative outlet that quickly transformed into a full-blown art practice that is all about experimenting with paper quilling.
Early on, I leaned heavily on the influence of macrame, working with white cardstock, mimicking its monochromatic knot patterns with quilling.
When I started craving color in my work, I let Mother Nature and woven tapestries be my guide, as I depicted land or sea paired with sky in my quilled landscape tapestries. I used various quilling techniques to explore the many textures found in the landscape.
There came a point where my tapestries just weren’t sculptural enough for my liking, so I let pottery inspire the forms of my quilled paper vessels.
When I wanted to create more figurative work, collage was the answer. Using found images from thrifted books, I transformed how the original image was perceived using colorful quilled details.
My recent 30-day quilled collage challenge “Good Hair Day 2021”
While my art practice has been an on-going experiment in paper quilling, textiles have been a constant source of inspiration for me. That connection was solidified when I read “Women’s Work: The First 20,000 Years. Women, Cloth and Society in Early Times”. Author Elizabeth Wayland Barber noted the research of Judith Brown, who hypothesized why women of early civilizations were tasked with textile production for their families over the men. It came down to child rearing. She noted five primary reasons why mothering and textile production were so compatible. The creation of textiles was:
1 | repetitive
2 | interruptible
3 | easy to resume after interruption
4 | production didn’t put children in danger
5 | and it didn’t take the participant far from home
These were the very same reasons I latched on to paper quilling as my artistic medium of choice in the summer of 2016. This revelation led to my current body of work, large-scale quilled paper doilies. Using a material commonly associated with the doily, paper, I return it to its labor-intensive origins with quilling, rather than crochet or lace. My doilies are 3 times larger than life as a way for me to celebrate the long history of women’s domestic creative labor. This series also allows me to examine my own experiences as a woman, wife and mother and speaks to my lifelong interest in home design and decoration.
MY PROCESS
Research and Sketching
All of my quilled doilies start with research. I am always gathering images and information from books and the web about the history, techniques, and patterns traditionally used in lace making and crochet. I sketch patterns and motifs along the way that I feel best translate into quilling. My favorite form of research is visiting thrift and antique shops to see and feel doilies and other crochet and lace remnants in person.
For this particular project, I wanted to create a round flower petal doily that utilized a diamond netting. I sketched a few ideas in my notebook that I referenced as I worked through the design.
Template
Once a basic design is sketched in my notebook, I create a template on my desktop, using blue painter’s tape. For this project, I laid out eight arms that radiate from the middle, and I marked the 18″ radius on all 8 arms to ensure my final doily was 3 feet in diameter. This template gives a basic guide to create the overall composition while allowing freedom to play with the design as I work. Too much rigidity about the final outcome at the start of a project takes the fun out of the process. An art practice based in experimentation means leaving plenty of room to adjust as I go. I always start with a plan but have found that not every idea works in practice, and sometimes the best solutions pop up as I go.
Production and Assembly
All of my quillings contain hundreds of individual quilled shapes made from strips of paper that are individually folded, rolled or curled, and then assembled into larger motifs. Those motifs are then assembled into an overall larger composition. I find I am constantly moving back and forth between production and assembly, and I prefer it this way, as it breaks things up.
Production
The production process starts with the shredding of paper, lots of paper, into 1⁄4″ × 11.5″ strips. I usually shred about five sheets at a time and return to shred more as I go.
Once my paper is shredded, it is on to the production of the individual quilled shapes. Curling up on the sofa with a binge-worthy TV series is the perfect setting for this step, as rolling and folding hundreds of strips of paper can get quite boring.
Most of my quilled doilies contain just 2–4 different quilled shapes. Limiting the number of shapes speaks to crochet and lace making which rely on just a few different stitches to create more complex compositions. For this doily I used four different quilled shapes (Shown in the image below from left to right): Folded Teardrop, Folded Heart, Folded Diamond, and Rolled-Eye.
TOOLS
Quilting Tool | I found this particular quilling tool in our house, built in 1941, while I was pulling up the carpeting on our stairs. I love the idea that the previous owner may have also been a quiller like me.
Glue | I use a PH Neutral and PVA glue that I put in a small needle tip glue bottle for more precise application.
Scissors
Cardstock | I prefer white 65lb 8.5″× 11″ cardstock.
Strip Paper Shredder | This is the ultimate quilling hack! Creating large-scale quillings means I need
A LOT of paper strips. Strip paper shredders cut sheets into 1⁄4″ wide strips that are 11.5″ long. Occasionally a design will call for thicker or thinner strips of paper and when they do, I get out my rotary paper cutter.
Painter’s Tape | Perfect for creating templates on my desktop that can later be removed without damaging the tabletop.
Parchment Paper | This also makes an excellent template. Its waxy surface ensures the quilling won’t easily stick to it.
Mini Wooden Clothespins | Hold quilled shapes in place while the glue dries.
Hands | Perhaps the most important tool of all (and free!).
HERE’S HOW I MADE EACH SHAPE
Folded Teardrop Shape
Using a quarter-length strip of card stock I glued the ends together, without creasing the paper, to create a teardrop shape.
Folded Heart Shape
With a half-length strip of card stock, I folded and creased the strip in half, then folded in the ends, without creasing it, to create a heart shape, gluing where the ends meet.
Folded Diamond Shape
Using a half-length strip of card stock, I folded and creased the strip in half, gluing the ends together. Then I squeezed the creased point and the glued end together, creasing the bulging sides, to create a diamond shape.
Rolled-Eye Shape
Using a full-length strip of card stock, I rolled it using my quilling tool into a circle shape the size of a dime. This ensures size consistency. I then pinched opposite sides of the circle to create an eye shape.
ASSEMBLY
After a hefty pile of my various quilled shapes has been created, it’s on to the assembly of the shapes into motif. This doily consisted of just two different motifs: Flower Petal and Diamond Netting.
Flower Petal Motif
To make the Flower Petal Motif, I created a template with parchment paper, to ensure size consistency. I then assembled and glued 13 alternating rows with the Rolled-Eye Shape and Folded Teardrop Shape.
Diamond Netting Motif
Lace and crochet often rely on a netting to fill the areas between more decorative motifs. For this doily I created my own quilled netting by gluing 55 Folded Diamond Shapes together into a larger triangular shape.
Then it’s back to production mode as I had to repeat the Flower Petal Motif and Diamond Netting Motif eight times each.
With eight Flower Petal Motifs and eight sections of the Diamond Netting made, I began arranging them on my desktop template. I placed the Flower Petal Motifs on the 8 radiating arms of my template, inserting the netting between them. I then glued them together and used mini clothespins to hold everything together while it dried. The resulting shape was a circle with an 8 pointed star in the middle.
Adding Texture
I love adding details to my quillings that cannot be as easily achieved with crochet or lace-making techniques. For this piece, I added texture by inserting the Folded Heart Shape at roughly a 45-degree angle into the Diamond Netting sections of the doily, leaving two rows of diamond netting open on either side of the Flower Petal Motif.
Final Details
Now, with 16 arms radiating from the middle of my doily, alternating between the Flower Petal Motif and the newly textured Diamond Netting Motifs, I then tapered each of these 16 arms to a point, so each resembled a flower petal and the whole doily looks like a giant flower.
I added six Folded Diamond Shapes to the end of each of the eight Flower Petal Motif arms, so each was fully surrounded by the diamond netting. For the eight textured Diamond Netting sections of the piece, I tapered them off with Folded Hearts to create the petal shape that I then finished off with the Rolled-Eye Shape.
For display purposes, I tie my finished doilies to black indoor-outdoor fabric with thread and needle and suspend it from a wall mounted curtain rod. But before I do this, I love to take my doilies outside to photograph them amongst natural and architectural elements. Taking these doilies out of the domestic setting helps recontextualize them, expanding appreciation for the domestic creative labor of women, the benefits reaching far beyond the four walls of the home.
Related Stories
THE JOURNEY
Paper quilling made its first appearance in my life in the third grade. I made a vase and flowers composed of rolled construction paper for a school art project. It would be another twenty years before I tried my hand at quilling, this time as a mom and military spouse in desperate need of a creative outlet.
During my quilling hiatus, I pursued my first creative passion, interior architecture. My childhood was spent perfecting the design of Barbie’s dream house in a spare bedroom that my parents and I affectionately nicknamed “The Barbie Room.” When I outgrew Barbie, I switched to drawing floor plans and redesigning the homes of friends and family. I learned the basics of drafting floor plans from my dad, who worked in kitchen and bathroom design. He would bring stacks of scrap paper home from work with floor plans and elevations on them, for me to draw on the backside. I inevitably took an interest in those drawings and began making my own. This passion for home design led me to study architecture in college followed by a master’s degree in interior design. I then spent the next 10 years working as an interior designer and teaching it to undergraduate students. In that time, I married my high school prom date, and his Army career moved us to Fayetteville, NC, where we welcomed our two older children.
I found myself home with our children, working remotely teaching design and decorating for residential clients part time, frequently solo-parenting for weeks or months at a time, as military spouses often do. By the summer of 2016, I was in desperate need of a creative outlet that was all my own. I needed something tangible to show at the end of those long and sometimes lonely days that inevitably occur in early motherhood and in military life. My design work, while creative, existed wholly on my computer and was an answer to my clients’ needs and wants, not my own and my kids’ playdough and finger paints just weren’t scratching the itch.
At the time, weaving and macrame wall hangings were seeing a comeback in home decor. I was frequently sourcing them for my clients because I loved the texture and sculptural qualities they brought to a room. I wanted my creative hobby to have the same qualities as macrame and weaving. I knew these particular crafts would require me to take some type of course to learn the basics, and that just wasn’t in the cards for me in that season of life. I needed something I could dive right into. That’s when I remembered making a textural piece of art, using only paper, way back in elementary school. If third-grade Griffin could roll paper, thirty-something Griffin certainly could too!
For my first “rolled paper” project, as an adult, I used what I had on hand, white printer paper, a paper trimmer, markers, a toothpick and Elmer’s glue. I colored the paper shades of green and blue, cut the sheet into strips, rolled the strips with my toothpick and glued the circular shapes to black construction paper. I cut away the excess black construction paper around the edges of the piece, resulting in a small mass of green and blue coils at varying heights. It wasn’t anything spectacular, but I enjoyed the process and saw lots of potential. I also learned, thanks to Google, that “rolled paper art” was actually called quilling, and had a long tradition dating back to nuns in the Renaissance.
The thing that bothered me about my first two attempts at paper quilling was the paper backing that the rolled shapes were attached to. Macrame and weaving do not require a backing; their rope and thread act as both the structure of the piece and its decoration. My years working as an interior designer ingrained in me the value of form and function working in tandem. My quilled art could not be only surface decoration, it also had to serve a function, as the structure too. The paper backing had to go!
I started gluing the quilled shapes to each other and switched from printer paper to cardstock for added stability. Now form and function were working hand in hand in my quillings and in turn mimicking the qualities I loved so much about textiles. I had found my creative outlet that quickly transformed into a full-blown art practice that is all about experimenting with paper quilling.
Early on, I leaned heavily on the influence of macrame, working with white cardstock, mimicking its monochromatic knot patterns with quilling.
When I started craving color in my work, I let Mother Nature and woven tapestries be my guide, as I depicted land or sea paired with sky in my quilled landscape tapestries. I used various quilling techniques to explore the many textures found in the landscape.
There came a point where my tapestries just weren’t sculptural enough for my liking, so I let pottery inspire the forms of my quilled paper vessels.
When I wanted to create more figurative work, collage was the answer. Using found images from thrifted books, I transformed how the original image was perceived using colorful quilled details.
My recent 30-day quilled collage challenge “Good Hair Day 2021”
While my art practice has been an on-going experiment in paper quilling, textiles have been a constant source of inspiration for me. That connection was solidified when I read “Women’s Work: The First 20,000 Years. Women, Cloth and Society in Early Times”. Author Elizabeth Wayland Barber noted the research of Judith Brown, who hypothesized why women of early civilizations were tasked with textile production for their families over the men. It came down to child rearing. She noted five primary reasons why mothering and textile production were so compatible. The creation of textiles was:
1 | repetitive
2 | interruptible
3 | easy to resume after interruption
4 | production didn’t put children in danger
5 | and it didn’t take the participant far from home
These were the very same reasons I latched on to paper quilling as my artistic medium of choice in the summer of 2016. This revelation led to my current body of work, large-scale quilled paper doilies. Using a material commonly associated with the doily, paper, I return it to its labor-intensive origins with quilling, rather than crochet or lace. My doilies are 3 times larger than life as a way for me to celebrate the long history of women’s domestic creative labor. This series also allows me to examine my own experiences as a woman, wife and mother and speaks to my lifelong interest in home design and decoration.
MY PROCESS
Research and Sketching
All of my quilled doilies start with research. I am always gathering images and information from books and the web about the history, techniques, and patterns traditionally used in lace making and crochet. I sketch patterns and motifs along the way that I feel best translate into quilling. My favorite form of research is visiting thrift and antique shops to see and feel doilies and other crochet and lace remnants in person.
For this particular project, I wanted to create a round flower petal doily that utilized a diamond netting. I sketched a few ideas in my notebook that I referenced as I worked through the design.
Template
Once a basic design is sketched in my notebook, I create a template on my desktop, using blue painter’s tape. For this project, I laid out eight arms that radiate from the middle, and I marked the 18″ radius on all 8 arms to ensure my final doily was 3 feet in diameter. This template gives a basic guide to create the overall composition while allowing freedom to play with the design as I work. Too much rigidity about the final outcome at the start of a project takes the fun out of the process. An art practice based in experimentation means leaving plenty of room to adjust as I go. I always start with a plan but have found that not every idea works in practice, and sometimes the best solutions pop up as I go.
Production and Assembly
All of my quillings contain hundreds of individual quilled shapes made from strips of paper that are individually folded, rolled or curled, and then assembled into larger motifs. Those motifs are then assembled into an overall larger composition. I find I am constantly moving back and forth between production and assembly, and I prefer it this way, as it breaks things up.
Production
The production process starts with the shredding of paper, lots of paper, into 1⁄4″ × 11.5″ strips. I usually shred about five sheets at a time and return to shred more as I go.
Once my paper is shredded, it is on to the production of the individual quilled shapes. Curling up on the sofa with a binge-worthy TV series is the perfect setting for this step, as rolling and folding hundreds of strips of paper can get quite boring.
Most of my quilled doilies contain just 2–4 different quilled shapes. Limiting the number of shapes speaks to crochet and lace making which rely on just a few different stitches to create more complex compositions. For this doily I used four different quilled shapes (Shown in the image below from left to right): Folded Teardrop, Folded Heart, Folded Diamond, and Rolled-Eye.
TOOLS
Quilting Tool | I found this particular quilling tool in our house, built in 1941, while I was pulling up the carpeting on our stairs. I love the idea that the previous owner may have also been a quiller like me.
Glue | I use a PH Neutral and PVA glue that I put in a small needle tip glue bottle for more precise application.
Scissors
Cardstock | I prefer white 65lb 8.5″× 11″ cardstock.
Strip Paper Shredder | This is the ultimate quilling hack! Creating large-scale quillings means I need
A LOT of paper strips. Strip paper shredders cut sheets into 1⁄4″ wide strips that are 11.5″ long. Occasionally a design will call for thicker or thinner strips of paper and when they do, I get out my rotary paper cutter.
Painter’s Tape | Perfect for creating templates on my desktop that can later be removed without damaging the tabletop.
Parchment Paper | This also makes an excellent template. Its waxy surface ensures the quilling won’t easily stick to it.
Mini Wooden Clothespins | Hold quilled shapes in place while the glue dries.
Hands | Perhaps the most important tool of all (and free!).
HERE’S HOW I MADE EACH SHAPE
Folded Teardrop Shape
Using a quarter-length strip of card stock I glued the ends together, without creasing the paper, to create a teardrop shape.
Folded Heart Shape
With a half-length strip of card stock, I folded and creased the strip in half, then folded in the ends, without creasing it, to create a heart shape, gluing where the ends meet.
Folded Diamond Shape
Using a half-length strip of card stock, I folded and creased the strip in half, gluing the ends together. Then I squeezed the creased point and the glued end together, creasing the bulging sides, to create a diamond shape.
Rolled-Eye Shape
Using a full-length strip of card stock, I rolled it using my quilling tool into a circle shape the size of a dime. This ensures size consistency. I then pinched opposite sides of the circle to create an eye shape.
ASSEMBLY
After a hefty pile of my various quilled shapes has been created, it’s on to the assembly of the shapes into motif. This doily consisted of just two different motifs: Flower Petal and Diamond Netting.
Flower Petal Motif
To make the Flower Petal Motif, I created a template with parchment paper, to ensure size consistency. I then assembled and glued 13 alternating rows with the Rolled-Eye Shape and Folded Teardrop Shape.
Diamond Netting Motif
Lace and crochet often rely on a netting to fill the areas between more decorative motifs. For this doily I created my own quilled netting by gluing 55 Folded Diamond Shapes together into a larger triangular shape.
Then it’s back to production mode as I had to repeat the Flower Petal Motif and Diamond Netting Motif eight times each.
With eight Flower Petal Motifs and eight sections of the Diamond Netting made, I began arranging them on my desktop template. I placed the Flower Petal Motifs on the 8 radiating arms of my template, inserting the netting between them. I then glued them together and used mini clothespins to hold everything together while it dried. The resulting shape was a circle with an 8 pointed star in the middle.
Adding Texture
I love adding details to my quillings that cannot be as easily achieved with crochet or lace-making techniques. For this piece, I added texture by inserting the Folded Heart Shape at roughly a 45-degree angle into the Diamond Netting sections of the doily, leaving two rows of diamond netting open on either side of the Flower Petal Motif.
Final Details
Now, with 16 arms radiating from the middle of my doily, alternating between the Flower Petal Motif and the newly textured Diamond Netting Motifs, I then tapered each of these 16 arms to a point, so each resembled a flower petal and the whole doily looks like a giant flower.
I added six Folded Diamond Shapes to the end of each of the eight Flower Petal Motif arms, so each was fully surrounded by the diamond netting. For the eight textured Diamond Netting sections of the piece, I tapered them off with Folded Hearts to create the petal shape that I then finished off with the Rolled-Eye Shape.
For display purposes, I tie my finished doilies to black indoor-outdoor fabric with thread and needle and suspend it from a wall mounted curtain rod. But before I do this, I love to take my doilies outside to photograph them amongst natural and architectural elements. Taking these doilies out of the domestic setting helps recontextualize them, expanding appreciation for the domestic creative labor of women, the benefits reaching far beyond the four walls of the home.
The Women Create Foundation is a catalyst for small but significant strides to empower women creators through grants that help bring projects to life and foster innovation.